Friday, April 22, 2011

The Lightning Legion arises...

A bit later than expected, but the Skeletons arrived from Maelstrom this morning. I also got another batch from Ebay yesterday however I realised I had accidentally bought the old gnarled looking Skeletons so had to send those back.

I began converting with the VC ones from Maelstrom immediately (luckily my bits order of bows came in this morning too). I found making a dynamic shooting pose would be too difficult given the frailty of the models, so I opted for a slow marching unit reaching for their arrows. The first Skeleton and the Standard Bearer (both WIP) can be seen below.


I have attached quivers from the Wolf Rider sprues and I still need to sculpt straps onto them.

I've also been converting the first of two Screaming Skull (Trebuchets) from scratch. I will need to do a lot of sculpting (oh joy) to make the wooden beams, the straps, and the flames around the skull. Should look class when it's finished though.


Tuesday, April 19, 2011

Sand and Shotguns...

So I've been playing a lot of Empire lately, mainly due to my poor performance at Warpcon and thus wanting to improve on them in the weeks off from tournament practice. After talking with Rob it was established that my playstyle was too agressive with them being used to my Warriors of Chaos playstyle. Over the last few weeks then I've been practicing the art of defensive play and have come out with a good few wins against Skaven, High Elves, and Lizardmen.

Funny story, I come up against Dwarfs tonight, and my mindset is so set on defensive, that I waste a turn sitting back, and then after I get outgunned I've a long run to get to his lines. After a good smashing (and a lot of utterly crappy dice rolls) I managed to claw back some points and bring it down to a 11-9 loss. What did I learn from the game? I must normally be playing the army right as of late :)

In other news I've decided to shamelessly jump on the Tomb Kings bandwagon as they look like buckets of fun to play with and model. I've decided for the first time ever to run a full on painting blog on an army from start to finish; this along with the fact that look like a joy to paint should see a swift finish and avoidance from the grey-plastic-fate that befell my Empire. I expect to get my first Vampire Counts Skeletons and spare bows for conversions around Wednesday, so I'll begin the blog then.

Until then...

Friday, April 15, 2011

King of the Gnoblars - Game 5

So Game 5 and I'm down to table 7 after the crushing defeat to Nigel's Daemons. I needed a good game to get back up and running, however it wouldn't be so cut and dry. I got Bretonnians in the Blood and Glory scenario; they had fortitude 10! The list wasn't optimal however it had been doing reasonably well all weekend.

Lord
Pegasus, Cuirass of Fortune, Sword of Battle, Virtue of Heroism, Shield

Propethess [ Level 4 ]
Lore of Life, Chalice of Malfuer


Paladin
BSB, Dawnstone

Damsel
Lore of Beasts, Dispel Scroll, Warhorse


5x Pegasus Knights
Gallant, Standard Bearer

5x Pegasus Knights
Gallant, Standard Bearer

5x Pegasus Knights
Gallant, Standard Bearer


5x Knights of the Realm
Gallant

10x Men-at-Arms
Standard Bearer

10x Men-at-Arms
Standard Bearer

10x Men-at-Arms
Standard Bearer

40x Bowmen
Skirmishers, Standard Bearer


Trebuchet
Trebuchet


Word of warning, I'm rather hazy on this game and some event still don't make sense in my memory. Furthermore there was a lot of 'confusion' as the Bretonnian list submitted was not the same as the one played apparently, so some events in the game are up in the air regarding what should actually have happened. The list above is what I have constructed from my experience against it.

Anyway for spells I got Miasma, Enfeebling Foe, Pit of Shades, and Mindrazor, while he got Earth Blood, Throne of Vines, Shield of Thorns, Dwellers, Wysan's Wildform, and Curse of Anrehir. Chosen got the stubborn ward. I got to go first as he prayed; diagram below shows deployment and vanguard which I won the roll off for.

Image


Turn 1

The Horsemen got things kicking by moving to block up one of the Pegasus units (after I realised I was an 2" short of chucking axes at the Trebuchet). The Knights advanced a healthy amount while the three infantry movements moved full pace. The Shrine kept within the 12" distance to the Chosen but tried to shuffle out eastward.

With Shadow magic of little use at this early stage the Lord used his Third Eye to use the Lore of Life and got off Throne of Vines and then an irresistable Dwellers which took out 4 of the 5 western Pegasi. The Shrine did something crappy and the Horsemen wounded the Pegasi twice, though both were saved. The Hellcannon followed up a good turn, and though it did no damage, it caused a Trebuchet to panic.

The Bretonnians sounded a double charge against the Knights with the Pegasi and Lord, while the other Pegasi unit hit the Horsemen who S&S to no effect. The lone Pegasus Knight in the west moved to try block up the infantry. Magic had no effect and in what would be a trend for almost the whole game, the Trebuchet missed. The Bowmen however killed a single Chosen (somehow).

In combat his Lord HKB'ed two Knights thanks to being able to to re-roll 1's to hit and wound; as it turned out the Cuirass only allows re-rolled 1's to wound, and that was a critical mistake made that had a big impact on the game. The Knights struck out and did 5 wounds to the Pegasus Knights in return, and the Lord broke. The Pegasus Knights however rolled exactly what they needed to stay (which is where the above mistake comes into play as they would have lost by a further 2 without the wounds done to the Knights and the Lord only ran 7" so I probably would have caught him). Needless to say elsewhere the Horsemen were beaten and run down.

Image


Turn 2

Thanks to an error in James' placement of the lone Pegasus Knight the Warriors were able to flank it while the rest of the infantry ran forward full throttle again. Magic did nothing this turn and the Hellcannon missed altogether and the Shrine gave the Chosen the +1A I had been waiting for, freeing it to go do its own thing for the rest of the game. In combat another Pegasus Knight fell but they held still against the Knights. The Warriors broke the lone Knight and ran him down.

The Bretonnian turn started bad with the Lord failing to rally. The BSB left the unit just to make sure this wasn't going to happen again. His unit then moved up though staying in reach should he wish to return to them. The Pegasi in the east reformed to face the Knights' flank. The Propethess also left her unit, seeing the incoming Chosen.

Magic was impressive, wiping out 22 Marauders with Dwellers while the Bowmen took out another 10, effectively neutralising the unit. In combat the Knights fluffed and fought the Pegasi to a stalemate.

Image


Turn 3

The Chosen finally made their charge, whethering the hail of arrows to close in with the Bowmen. The Warriors reformed so the Lord could Dwellers the Knights. The Marauders began the retreat after passing their Ld test, and the Shrine moved off East to help out the Knights.

Dwellers got off without a hitch but only took out 2 Knights. The Hellcannon scattered wide. In combat another Pegasus Knight fell however the Champion still managed to hold. The Chosen began a massacre killing ~14 Bowmen. I watch gleefully as James rolled to dice and got a 5 but then he said passed and I looked down to see one of the skirmishing Bowmen was in the forest making them steadfast :? Oops.

Now this is the part when my memory fails me, as from the way I remember it the Knights were in the spot I showed last turn, however they should have obviously charged then in this turn, so something is escaping me as they didn't charge. They were however rejoined by the BSB after the Lord rallied. The Pegasi on the eastern flank charged the Knights while one of the Men-at-Arms units moved out. Magic was unsuccessful as usual and as usual the Trebuchets missed.

In combat I lost another Knight however I killed his last Knight to the front and wounded one of the flanking Knights. This tied us and unfortunately one of those list confusions I mentioned at the start happened here as we both called Musician for the draw (submitted list had no Musicians). Rules failure too as we thought you only get free combat reforms when you win so I tested Ld and failed, leaving me flanked. The Chosen killed roughly the same as last turn however the Bowmen remained steadfast.

Image


Turn 4

I started my turn with a double charge from the Hellcannon and Shrine into the Pegasus Knights fighting my Knights. The Marauders continued the retreat while the Warriors tried (unsuccessfully) to block the Knights' charge path. In magic I tried some Shadow stuff to no avail. In combat I killed off a Knight and did another wound, but he managed to kill a Chaos Knight, wound the Hellcannon and hold. Finally the Bowmen were utterly slaughtered.

In his turn the Knights rear charged the Marauders, while his Lord and MAA dual charged the Shrine. In magic he got IF Dwellers on my Warriors unit only to learn my Lord was immune (Phylactery FTW), though he took out 4 Warriors. However his Propethess then lost a level and the Dwellers spell (though that meant I couldn't use it anymore either).

In combat the Knights killed 4 Marauders who failed to do damage in return but held nonetheless. The big fight in the east wasn't as bloody as would have seemed with only 3 MAA falling, calling another tie on Musicians.

Image


Turn5

My Warriors started off badly in the turn going stupid from the mushrooms in the forest and ambling forward (they were faced wrong in the last diagram). The Chosen moved back toward the centre while everything else fought. The Sorcerer got an IF Pit of Shades that scattered, losing a wound. In combat the Knights finally killed the Marauders and reformed to charge the flank of the Warriors. In the big combat things fianlly went my way as I killed some Pegasus Knights and MAA to win the combat, breaking both the Lord and Pegasi. The Knights chased the Pegasi off the table, but the Lord could freely flee as the MAA held causing the Shrine to block the Hellcannon's pursuit path, thus the cannon stayed (note the diagram is wrong; the Hellcannon ended up in that spot after turn 6, not turn 5).

The Bretonnian Lord rallied easier this time while the KOTR flanked the Warriors. Everything else shuffled. Again no magic or shooting damage though two Knights were Regrown. In combat the Warrior Champion challenged and the BSB accepted killing the Champion. However the Sorcerer, though taking a wound for his troubles, managed to kill a Knight, and though losing by 2 the Warriors stayed.

Image


Turn 6

The Hellcannon rampaged but landed an inch out from the MAA fighting the Shrine. To try get points the Chosen charged the MAA nearby, who fled (this was fine as you got points at this tourney for fleeing units, so he may not rally). The Knights came back on the board.

For magic I went all out on one spell, Mindrazor. Having to challenge the Sorcerer fought and killed the BSB. The rest of the combat went on with two more Knights falling. The Shrine killed 4 MAA this time but somehow the lone jammy peasant held.

Unfortunately the MAA that fled from the Chosen rallied. Meanwhile the Lord charged the Hellcannon. Magic again only saw one Knight Regrown and shooting missed again. In combat two more Knights were killed however the Damsel managed to kill the Sorcerer Lord :shock: Still the Knights broke and were run down. The last Peasant was also killed by the War Shrine and his nearby buddies passed their panic test. The Lord netted some return points however by HKB'ing the Hellcannon.

Image


Conclusions

Fun game and good experience. One thing I learned is how mistakes in army book rules can cause big result issues and thus I need to learn the less common books more. Other things such as the phantom musicians also may have had impact, but losing combat by 1 on a Ld8 unit probably isn't going to net too many results. It was close, and netting that single unit of MAA had they not rallied would have won me the scenario. However I did walk away with a 15-5 win as the tournament used a varied VP system whereby normal VPs were used for a B&G game with no winner; more on this little tid bit later (it's embarassing).


Overall

Well I'll start with results; I crawled my way into 10th place. However me being eager to tidy up after a long weekend submitted the wrong results; I mentioned above the altered B&G scoring. This was the first time this had been used and as such being in a rush I didn't not see it and started VP on 10-10 with bonus points rather than go straight VP as we were meant to. As such I submitted a 13-7 result by accident and didn't realise my mistake until the results were published so on the board I was 11th instead. Still, it's not a big deal as I know my true placing and my goals were to come top 10 and get a prize. Speaking of which, that cake had some icing as I got voted for best painted army which I was delighted with (it's been a good few yrs since I won a best painted army award).

So coming away from the weekend what did I learn:

- Chosen are very situational based on what buffs they get, unlike what the internet might tell you ("broken!").
- Armour of Morrslieb is not enough as was seen in the Daemon game.
- Dark Elves aren't half as bad a match up for my army as I had previously thought.
- Never take a situation at its face value; bad luck can still bite you in the ass.
- Incidentally even in the worst situation never give up as you never know what sort of comeback you might claw out.
- Know ALL of the army books inside out.
- You never fully know all the rules of this game.
- The controlling player is the player who owns the models....(you'd have to be there to understand).

Sunday, April 10, 2011

King of the Gnoblars - Game 4

So like I said at the end of the last report, Game 4, table 2 (we accidentally played on table 3), Battle for the Pass, Nigel Kavanagh (friend and nemesis; everybody's out to get Nigel), Daemons of Chaos. The onset says it will be a tough game but if I can do enough damage with magic and the Hellcannon while he comes to me I should get an edge. It's a big if though. His list is below.

Great Unclean One [ Level 1 ]
Balesword


Khorne Herald
BSB, ???

Nurgle Herald
Palanquin, Stream of Corruption, Noxious Vapours???

Tzeentch Herald
Spellbreaker, Master of Sorcery (Life)


~27x Bloodletters
Full Command

~16 Plaguebearers
Full Command, Standard of Seeping Decay

20x Horrors
Full Command???, Banner of Sorcery???


Fiend
Fiend

6x Flamers

Pyrocaster


Tough list, not really broken, but solid. He rolled up Miasma as his sole Nurgle spell. I rolled up Miasma, Enfeebling Foe, Pendulum, and Pit of Shades. The Chosen got +1T. I went first. Deployment below; you'll see my first mistake in that it was top of the morning and I placed my first deployment down without even thinking; that's my Horsemen. I also forgot to Vanguard them behind the hill, and as you'll see in my first turn I brainfart again and forget to move them.

As a general disclaimer I play like a noob in this game, so no preconceptions yeah ;)

Note the deployment diagram below is the only diagram this time as the length-ways diagrams don't go well with Blogger.

Image


Turn 1

My turn was simple, restrain the Hellcannon, move the Warriors into pit range, do magic (killed 1 Plaguebearer), and shoot the Hellcannon (killed 7 Bloodletters).

Nigel's turn was simple also; move up very fast, cast magic (got up Throne of Vines and Flesh to Stone on the Bloodletters) and shoot the Horsemen I forgot to hide behind the hill (dead Horsemen).


Turn 2

This turn I backed up my units and angled to Warriors inward for a shot at the GUO. I cast Pit of Shades at the GUO which he scrolled, and I used the rest of my dice to ditch his Throne of Vines. Hellcannon shot but only killed two Bloodletters due to the Flesh to Stone.

Nigel advanced forward full pace again, hiding the Horrors behind a building so I couldn't see his wizard (to steal his spells) and put the Furies and Fiends out to either flank respectively. He got a tonne of magic dice and ended up with a choice of dispelling Flesh to Stone or Regrowth and mistakenly threw my dice at Regrowth.

His Flamers shot, got a lucky 30 shots and despite low wound numbers and high armour saves, 3 Knights died.


Turn 3

My Knights were now forced to charge the Bloodletters or suffer multiple charges next turn. Everything else shuffled in order to prepare for something; Lord joined the Marauders to get a shot at the GUO.

Magic began, got IF Pit on the GUO but he passed his I test. It must be said at this point that I had attrocious luck all game except for when I rolled scatter dice in that I got a direct hit every time. The Hellcannon shot at the Flamers, killing two.

Combat went crap. I killed few Bloodletters thanks to his Flesh to Stone, but he only got one Knight in return and however I broke and he hit the Chosen, though failed to catch the Knights.

In his turn the GUO charged in. The Fiend in charged the Knights who got to safety and everything else shuffled. No magic and no shooting. ~7 Chosen were killed in combat for a few Bloodletters in return and ran a paltry 2" and were caught along with the BSB.


Turn 4

In my turn I decided to charge the Hellcannon into the remainind Bloodletters (~11 or so). The Marauders and unfortunatly my wizard were in a situation where if they didn't charge the Plaguebearers then they would probably be contending with the GUO as well when they did get into combat, so they charged. The Warriors moved up the flank to flank charge next turn, not seeing at all what was coming. The Knights rallied, and the Shrine moved to safety.

My magic failed to do anything and the Shrine tried blessing the Marauders but gave them a useless 6+AS. In combat my Lord was forced to challenge and his Herald accepted. His attacks did nothing so he used his breath weapon, did 7 wounds, and that was the end of my general. The Marauders lost about 6 men and killed a few Plaguebearers, winning the combat. The Hellcannon did well also, taking some wounds but killing 5 Bloodletters.

A move I somehow failed to see; the Flamers charged the flank of the Marauders. I would have reformed last turn had I seen it to make his 12" charge a 15" charge. Furies went in the back also. The GUO charged the Knights, and the Fiends took up positions on either of the Knights' flanks.

Nigel got off Flesh to Stone on the Plaguebearers which took away much chance of doing significant damage to them. In combat the Marauders killed 2 Flamers, a Plaguebearer, 4 Furies, and the Nurgle Herald, but lost about 16 of their own men and broke. They got away but the Fury was right behind them (if only they had killed the last one). The rest chose to stay put and reform. The GUO killed two Knights but they held. The Hellcannon continued to grind on the Bloodletters.


Turn 5

The only move I had was to reform both the Warriors and the Shrine for charges. Unfortunately the Marauders failed to rally which meant they were doomed to be killed by a single frik'n Fury :evil: The Shrine gave the Hellcannon +1AS and then it was straight to combat. The Knights fought the GUO to a stalemate. The Hellcannon killed all of the Bloodletters and with Thunderstomp did a wound to the BSB, but was left on a single wound of its own with no crew left to take the shot.

The Fiends charged the two flanks of the Knights and the Plaguebearers reformed hoping to get some buffing before facing the Warriors. The Flamers moved to shoot the Shrine and the Fury ran down the Marauders. Magic and shooting did nothing and combat was bloody. Unfortunately the BSB cut down the Hellcannon before it could strike, and the Knights were all killed.


Turn 6

In order to try and reclaim points the Shrine tried a long charge on the lone Fury but failed, and the Warriors hit the Plaguebearers head on. A few Plaguebearers were killed and a single Warrior.

The Daemon turn consisted of a failed long charge by the GUO on the Shrine and the remaining combat with the Warriors. The Warriors managed to get the Plaguebearers down to two men, but their proximity to the GUO along with a lucky roll mean the last two didn't evaporate and that was game.


Conclusions

I should really rename this section mistakes; 20-0 to Nigel. My obsession with killing the GUO was my major downfall here. It got my wizard killed (being caught in a fighty unit in a fight), and as a result having no magic made the remaining fights harder. I dispelled the wrong spells in the early game, made the muck ups with the Marauders, and didn't spot the Flamers' flank charge. This was also another game that showed that the Chosen need their ward save to be effective. I played my usual overall mistake of not taking my losses; once he got to my lines at the bottom of turn 2 I should have stopped trying to kill everything and started trying to mitigate what of mine he could kill; a draw would have been great. This is an area of Warhammer I sorely lack in in that I always go for the big win and it costs me sometimes; sometimes you have to accept you are going to lose and try and make that loss as small as possible. I learned a lot from this game so I can't complain too much.

The last game of the tournament was to be Blood and Glory on table 7 with James Fitzsimmons' Bretonnians.

Monday, April 4, 2011

King of the Gnoblars - Games 2 & 3

So after a rushed lunch (queues in the cafe were huge) round 2 began. As I said at the end of the game 1 report, I faced off against Ivan McGowan and his Dark Elves in the Watchtower scenario. At this event there was a slight catch; the tower wasn't always a tower but instead whatever piece of terrain was in the centre and any unit within 6" of the centre of that could contest it. I was told on Friday night to watch out that Ivan's list was full of filthy cheese (the fuzzy green kind) however I thought his list was rather balanced.

Supreme Sorceress [ Level 4 ]
Lore of Shadow, Sacrificial Dagger, ???


Death Hag
BSB, Cauldron of Blood, ???

Sorceress [ Level 2 ]
Lore of Fire, Dispel Scroll

Master
Dark Pegasus, Pendant of Khaeleth, Lance, Heavy Armour, Sea Dragon Cloak, Shield


20x Black Guard
Full Command, ???

10x Shades
Extra Hand Weapons

10x Shades
Extra Hand Weapons


30x Corsairs
Full Command, Sea Serpent Standard, Extra Hand Weapons

25x Spearmen
Full Command, Shields?

5x Dark Riders

5x Harpies


War Hydra

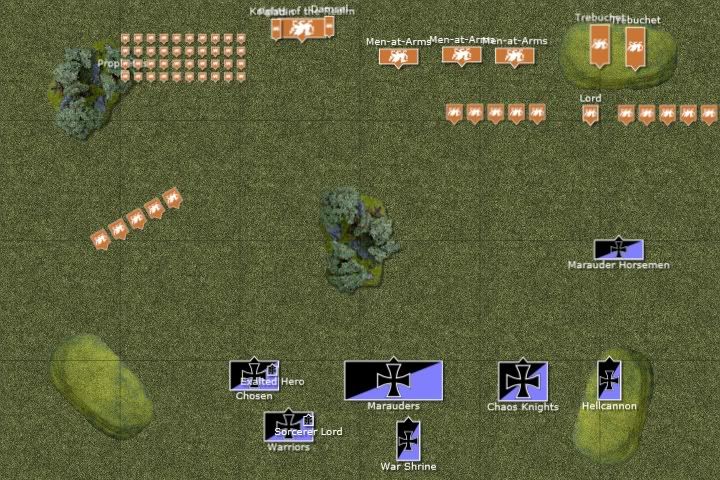
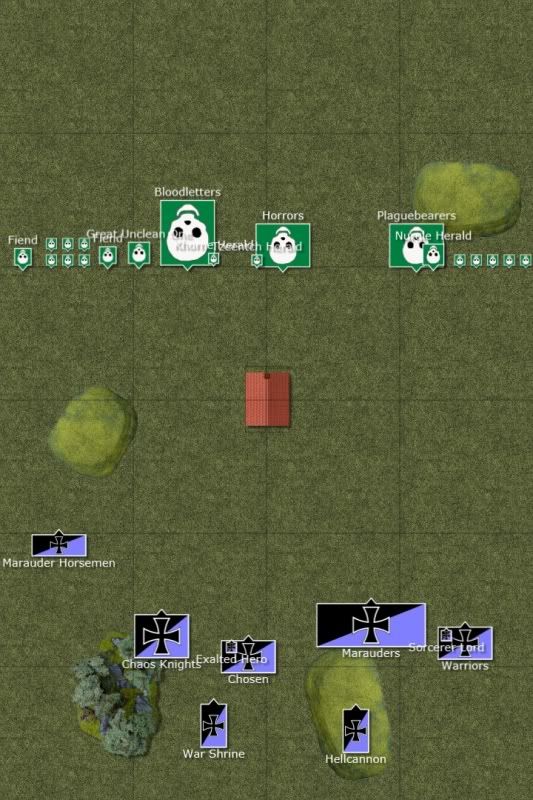
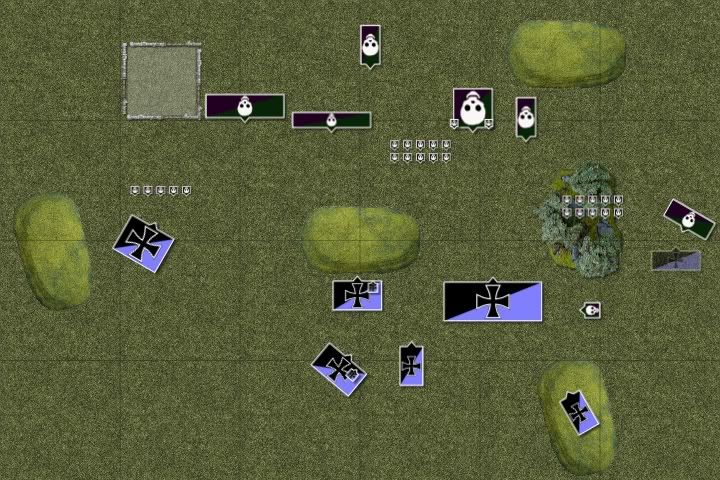
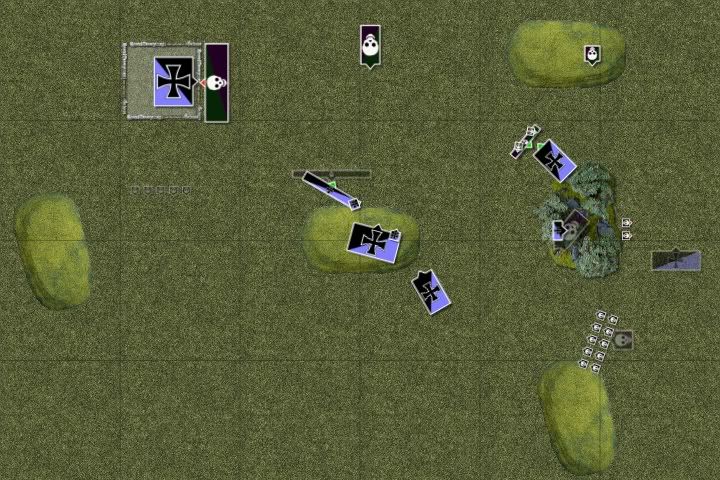
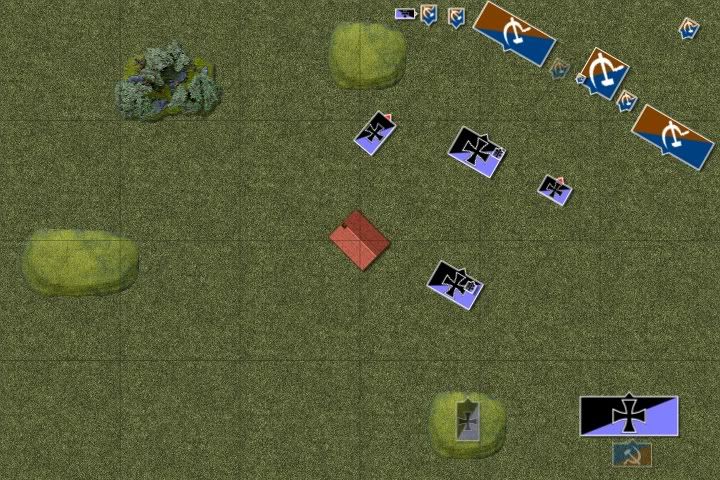
My main concern here was what the Corsairs and Black Guard could do with the right magic and/or Cauldron boost to my guys in combat. This made the Cauldron an obvious priority, however capatilising on it would be difficult. For spells I rolled up Miasma, Enfeebling Foe, Withering, and Pit of Shades. His Level 4 along with Power of Darkness had Miasma, Withering, Pit of Shades, and Okkams Mindrazor. The Level 2 had PoD, Fireball, and Flaming Sword of Rhuin. The Chosen swiftly rolled the 12 this time which was great for me as it would help them hold the hill. Ivan got the hill but had no unit to deploy on it. I got first turn. Deployment and his vanguard and scouts can be seen in the diagram below; his vanguard blocked mine as he won the roll off. As usual I was very careful to deploy so the Shades couldn't go behind my lines.

Image


Turn 1

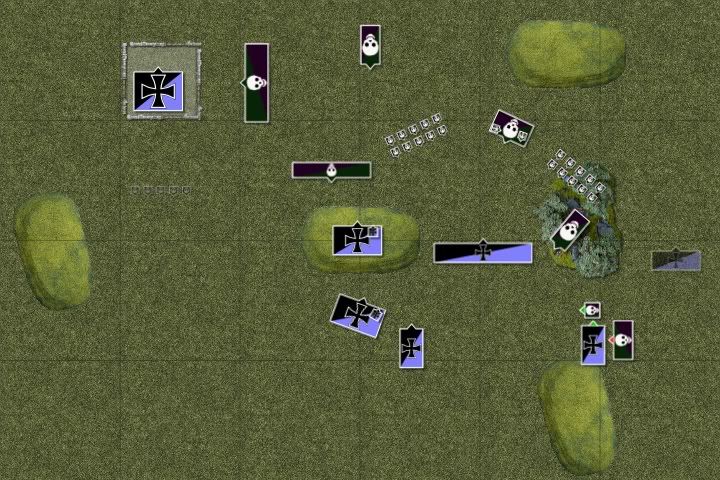
I advanced my whole army bar the Warriors who took a strategic spot to view the Hydra. With all my spells pretty much out of range I took on the Fire spells from his Level 2 an chucked all 6 of my dice at a top tier Fireball at the Hydra however I fluffed and rolled about a 9 on 6 dice :shock: 
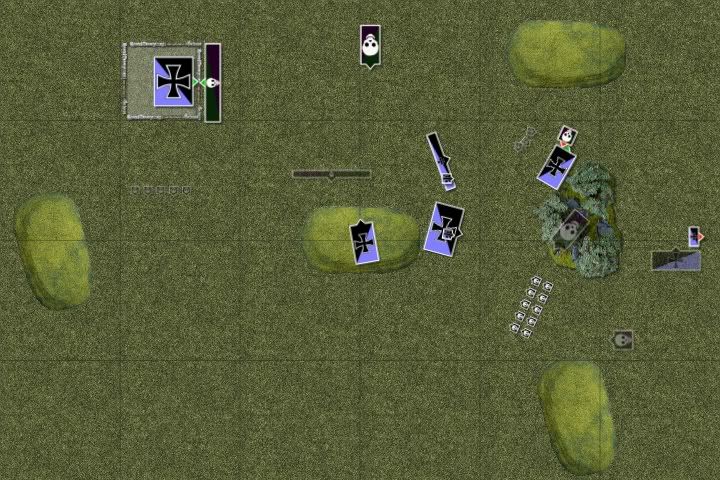
Hellcannon missed its target and the Horsemen failed to wound the Dark Riders. The Shrine gave the Chosen +1 AS.

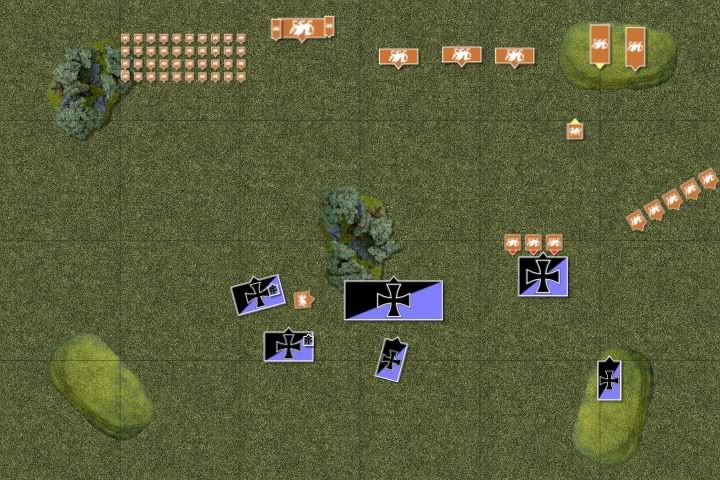
In his turn his Dark Riders reformed to allow the Shades to move up and shoot down the Horsemen. The Harpies moved to redirect the Knights and everything else shuffled a bit. The Master flew up and faced the flank of the Marauders. His magic did nothing and his shooting took out the Horsemen and 3 Marauders.
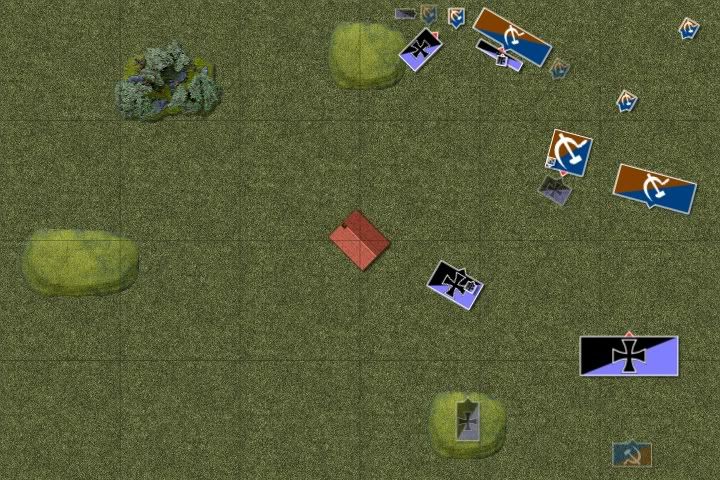
Image


Turn 2

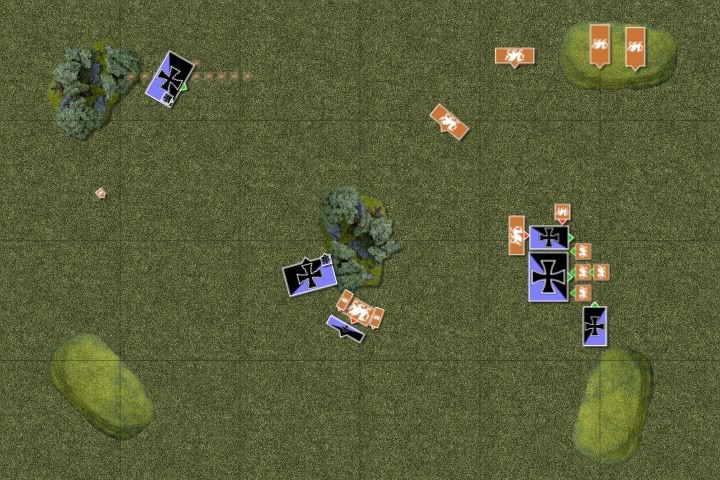
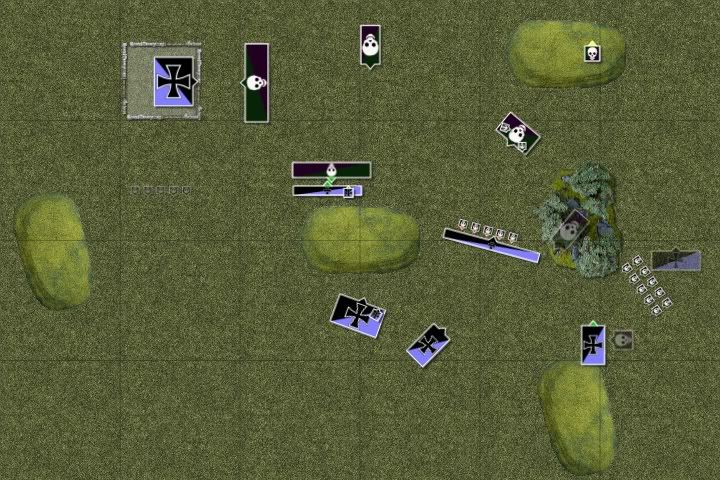
Thinking the Master likely had the Crown of Command in order to hold up the Marauders all by himself I flank charged him with the Hellcannon. The Knights charged into the Harpies and the Marauders failed a long charge on the Shades losing a few men on the way in. The Chosen moved up onto the objective and the Warriors shuffled a bit.

In magic I managed to Miasma the Shades and then in shooting the Shrine gave the Chosen MR(3). In combat the Hellcannon and Master fought to a stalemate with the Master than passing his break test on a 6 (turning to face the Hellcannon), though it had previously been revealed that he had the Pendant not the Crown and thus the threat to the Marauder flank was just a bluff to make me assume he had the Crown. Smart move :)

The Knight easily butchered the Harpies and overran out of the LOS of the Corsairs.

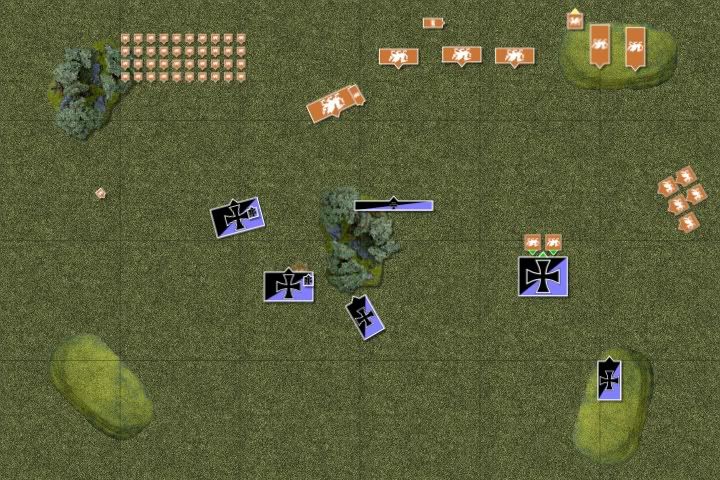
In the Dark Elf turn he charged the Hellcannons flank with the Dark Riders. The Shades moved back to safer pastures and the Hydra moved in on the horde's flank. The Black Guard advanced toward the objective and the Corsairs turned to face the Knights. The Cauldron put up a 5+ ward on the Black Guard.

In magic he made the Chosen T1 and gave the Shades the Flaming Sword but they still failed to wound any Chosen come shooting. She also got off Mindrazor on the Black Guard however in doing so miscast and blew up half of the Spearmen and wounded both Sorceress'. The Hydra and other Shades combined their shooting and killed off about half of the Marauder horde. In combat the Hellcannon killed one Dark Rider but the Dark Elves won the combat.
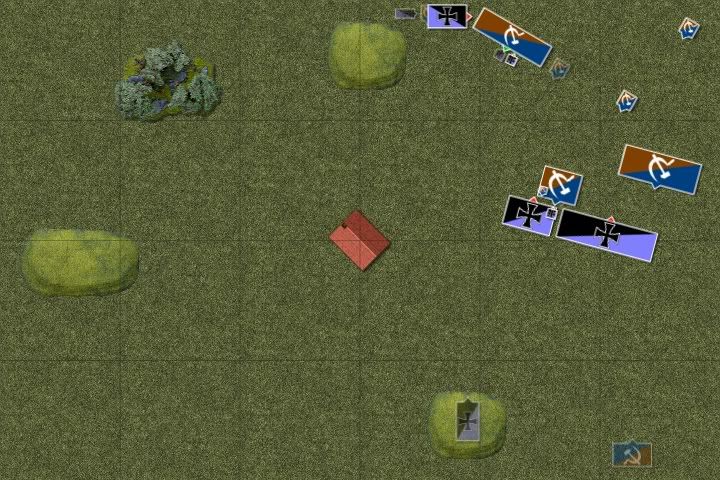
Image


Turn 3

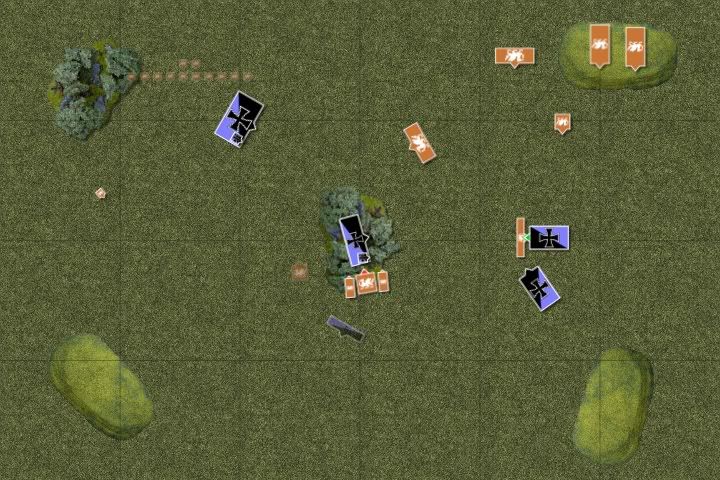
I realised the Black Guard were still outside the 6" from the objective and despite the Mindrazor I felt I needed to take the risk with the Chosen and charge them to keep them out of the scoring zone. Magic was good as I managed to Pit of Shades the Hydra and get rid of the Withering on the Chosen (not that it would matter this round). My Knight also reformed and ranked up behind the wall.

The Hellcannon killed of two more Dark Riders but they held their ground however the Master broke. The Chosen had a bad run as the Black Guard chopped down 5 of them for only 3 in return however the Chaos boys easily held. His other Shades moved around to try on the Hydra.

In retaliation the Shades charged the Marauders. The Spearmen shuffled and the Master failed to rally. This time in magic he put up the Mindrazor on the Corsairs but miscast again and lost the spell. Shooting yielded no results and combat turned around of the Dark Elves. Despite killing 2 more Chosen 4 Black Guard fell and lost the combat, though they held. The Hellcannon also managed to kill the last of the Dark Riders. The Shades did manage to beat the Marauders but lost a good few men and the Marauders held.
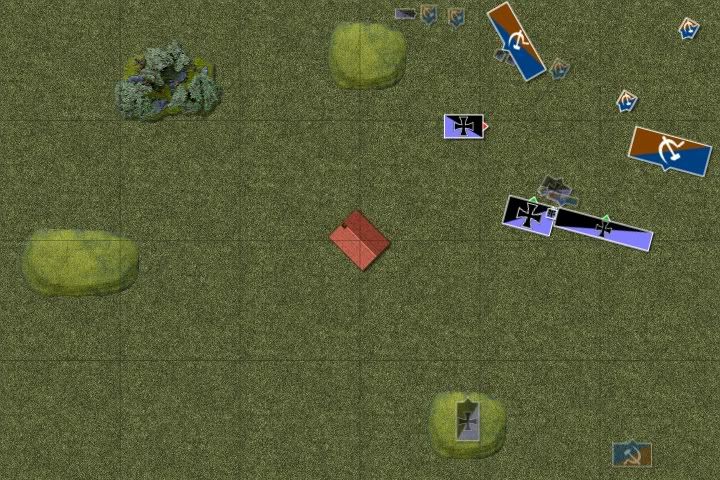
Image


Turn 4

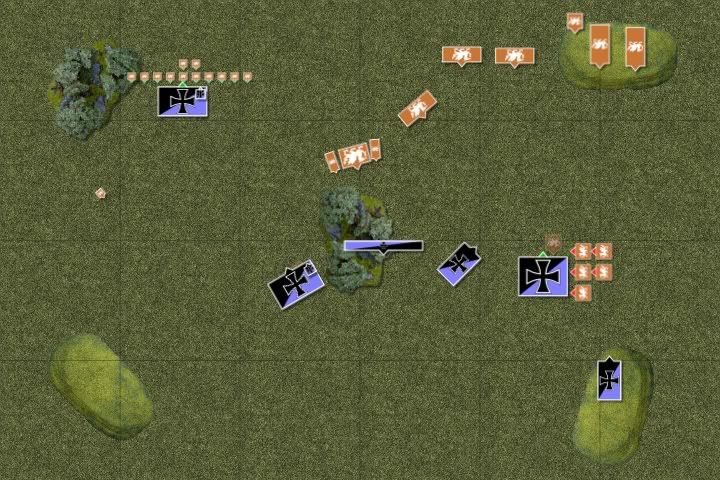
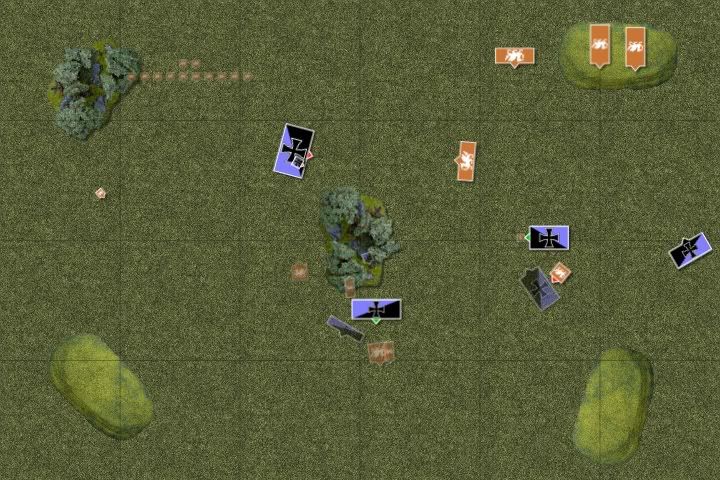
Despite the taunting of the Corsairs my Knights weren't going anywhere near a S8 horde and passed their Ld check to restrain from frenzy. Elsewhere the Hellcannon saw an opportunity and made a mammoth 16" charge into the flank of the Spearmen. The Warriors moved up onto the hill and the Shrine moved into range of the now depleted Chosen who had reformed into one rank at the end of the last combat.

Magic was of little consequence however in shooting the Shrine managed to give the Chosen +1 A, achieving the second desired result on the table. As a result in combat the Chosen killed the Black Guard to the last man despite their ward save, and for no wound in return. The Hellcannon killed a swathe of Spearmen however they remained steadfast and turned to face the mosntrous daemon engine. The Marauder beat the Shades and broke the last two. Note that in the diagram they are running east despite the combat facing otherwise; I distinctly remembering they running that way in the game, but I obviously have some detail wrong about the facing of the combat or soemthing or other.

Since the Knights were having none of it the Corsairs chanced their luck and charged. Elsewhere the Shades failed to rally but the Master was more successful. The bigger unit of Shades moved in toward the centre. The Cauldron gave the ward save to the Corsairs this time.

As far as I remember magic had no big effects this turn. The Hellcannon fluffed its combat round, and the Knights killed about 7 Corsairs for a single wound in return.

Image


Turn 5

Marauders charged the Shades off the board. The Warriors moved off the hill as they had a better chance to block up the incoming Shades than the Shrine, leaving the Shrine to take the hill. The Chosen moved toward the Spearmen.

In magic the Sorcerer tried a Pit of Shades on the Shades just for points but failed. In combat the Hellcannon killed off the Spearmen. The Knights lost another of their numbe but killed 7 more Corsairs.

The Dark Elves struck a counter-attack by charging the Master into the Hellcannon's flank. The Shades also advanced further toward the centre. Their shooting managed to take down a single Warrior. In combat the Hellcannon took a wound and one of his crew died, but he managed to kill the Level 4 and then the Level 2 with Thunderstomp, so won and turned to face the Master, who held fast. The Knights killed only a single Corsair this round fluffing totally but holding.

Image


Turn 6

The last two things to settle for the Chaos were to secure the objective from the Dark Elves and to take the last amount of points possible. The Chosen charged the Master in the flank. The Marauders moved as far away from the Shades as possible in case Ivan decided to try and get point back instead. The Sorcerer Lord left the Warriors and moved over the hill. The Warriors reformed into a line to block the hill with the Shrine parking next to them 1" away with both units just within the 6" meaning the Shades had no means of contesting.

The last bits were to clean up house. The Sorcerer Lord managed a Pit of Shades on the Cauldron killing it. The Knights killed another few Corsairs breaking their steadfast and running them down. Unfortunately however the Chosen failed to wound the Master and he killed a Chosen in return as well as passing his break test.

As a last ditch effort the Shades shot Warriors to try and panic them for points but failed to do any wounds. However despite losing the combat the Master held yet again.

Image


Conclusions

Well, that went much better than I had expected. After totting it was a 20-0 victory to me. I think things might have been closer had the Corsair taken Killing Blow from the Cauldron in the first round rather than the ward save as taking out the Knights would have netted back a lot of points to the Dark Elves and possibly been able to push through to the objective. As for my own army, the Hellcannon was easily the MVP accounting for the Dark Riders, the Spearmen, and both Sorceress'. I thought I played the Marauders badly getting bunged up in the centre but I can't complain as things worked out.

This win put me up to table 3 to face Dermot Maguire's Dwarfs in the Meeting Engagement. Seemed like a good scenario for me, but would it be? He had a rock solid list that didn't give away much points wise but relied on bunkering down in a small space to protect its war machines.


Runelord
Anvil of Doom, ???


Thane
BSB, Master Rune of Gromril, Rune of Resistance, ???


24x Hammerers
Full Command

Miners
Full Command

Grudge Thrower
Engineer, 2x Rune of Penetrating, Rune of Accuracy???

Grudge Thrower
Engineer, Rune of Penetrating, Rune of Burning, Rune of Accuracy???

Cannon
Engineer, ???


35x Dwarf Warriors
Full Command, Great Weapons

35x Dwarf Warriors
Full Command, Great Weapons


Organ Gun


Getting points back from this list without giving too much away myself was going to be tricky and it looked like getting points off the Warriors would take a dedicated assault from either the Marauders or two smaller units backed with magic. I rolled Miasma, Enfeebling Foe, Withering, and Pit of Shades. The Chosen for the first time did not roll up the ward save and instead got +1T. Deployment and Vanguard can be seen in the diagram below. The Marauders were kept in reserve unfortunately.

Image

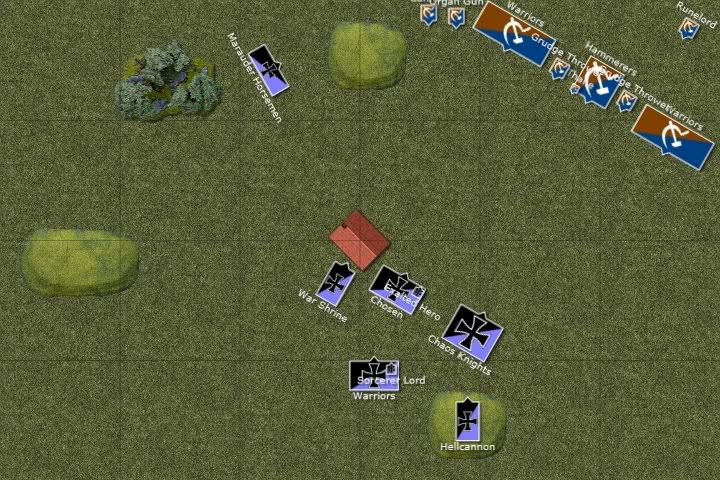
Due to deploying his whole army first he got first turn unless I stole it on a roll of a 6, which I failed to do.


Turn 1

Unsurprisingly the Dwarfs didn't move. Seeing the well placed Horsemen behind the hill (they could see his cannon ready to charge it, but were out of site of his Organ Gun), Derm started by hitting them with the Anvil, killing 4. With the Organ Gun out of range I thankfully weathered the first storm of shooting only losing one Warrior and one Chosen apiece, with the Cannon missing the Hellcannon and taking out one of its Chaos Dwarf crew instead.

In my turn the Marauders came on and the whole army advanced. The lone Horsemen tried to charge the Cannon but failed. I won't mention a magic phase in this report as Derm managed to dispel every single casting I got off; that is to say I failed a few castings as well. In shooting the Shrine gave the Chosen +1Ld, and the Hellcannon luckily took out one of the Grudge Throwers.
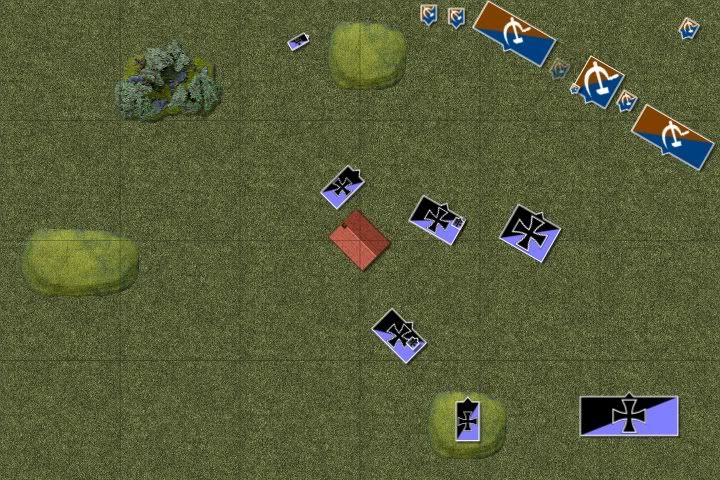
Image


Turn 2

Again not much movement (the Miners came on the board) and the shooting commenced. The Miners were Anvil'ed into the back of the Marauders. The Organ Gun reared getting 8 shots, wounding with all 8 on the Knights, and then I proceeded to fail 7 armour saves, losing nearly the whole unit to one shot. Grudge Thrower was greatly unsuccessful but the Cannon managed to flatten the Hellcannon. Already things were going bad. In combat the Marauders beat the Miners and chased them off the board due to Frenzy.

To start my turn the Marauders came back onto the board exactly the same as last turn :| In my turn the Knights tried a comfortable 12" charge at the Grudge Thrower with a nice overrun into the Anvil. Now that they were only 3 strong they were no good against the large infantry units after all. Going with the current theme of the game, they failed the charge by rolling a 3. The Shrine also tried a charge on the Organ Gun which also failed, however this was to be expected this time. The lone Horseman also managed to hit the Cannon. In shooting the Shrine once again failed to help, giving the Chosen +1Ld again. In combat the Horseman killed on Cannon crew, but failed to break them.

Image


Turn 3

The Dwarfs finally moved this turn, with the Hammerers charging the now weakened Knights and the Warriors moving out also. The Anvil smashed down on the Marauders, killing 3 and halving their movement. The Organ Gun opened fire on the Chosen and despite their T5 got multiple kills. The Grudge Thrower killed a few more Marauders. In combat the Knights fluffed only getting 2 kills and they were subsequently cut down. The Cannon crew managed to take down the Horseman too.

In my turn I foolishly sent the Chosen in against the Warriors horde, having been used to being able to send them into just about anything all day so far. I was gambling on getting the ward save this turn however it was a fool's hope. The Shrine managed a charge on the Cannon, and though they would likely fail the Marauders attempted a charge on the Warriors as the average failed charge move was now equal to their march move thanks to the Anvil. This paid off as even though they failed (needed double 6) they made a 6" failed charge, moving faster than they would have it they had marched. The Shrine failed to cough up the ward save and the Chosen were doomed. Several were cut down by the Dwarfs however they cut down 5 in return and actually won the combat by one. The Shrine easily dispatched of the remaining Cannon crew and reformed to have a choice of the Organ Gun and Dwarf horde.

Image


Turn 4

The Dwarfs held static again and started shooting. Another Anvil round on the Marauders along with a scattered Grudge Thrower saw a few die (and their movement halved again). The Organ Gun fired at the Shrine but failed to wound it. In combat the Dwarfs lost another few men but killed the Chosen down to just the Champion and BSB, though they passed their break test on a re-rollable 6.

The time to take back points would have to be now. Despite being at half movement the Marauders along with the Warriors had a comfortable charge on the Hammerers and took it. Both passed and both hit them in the front. The Shrine also charged the Organ Gun. As a lst ditch effort the Shrine blessed to last two members of the Chosen block but only managed an extra attack. In combat the Shrine killed to Organ Gun and though only needing a 3 to overrun into the flank of the horde, rolled snake eyes and was left stranded. The Chosen battled on and despite having 9 attack between the two men they fluffed and killed a single Dwarf leaving their doom certain as the Champion was cut down and the BSB died defending his banner. The Warriors and Marauders faired better. The unit champion was killed in a challenge by mine and another ~5 Hammerers were killed. A Warriors and a few Marauders were killed in return but I won and he held.

Image


Turn 5

For some reason unfathomable to me the Dwarf horde on the eastern flank didn't counter-charge the Marauders. Perhaps Derm knew that the Hammerers were done for and didn't want to give up more points by sending in the non-stubborn horde also. The Grudge Thrower tried to flatten the Shrine but failed and the Anvil elected not to fire incase it blew up. In combat another good amount of Hammerers were cut down for only a few Marauders in return, and yet the Hammerers stubbornness paid off again. The Sorcerer Lord and the Thane were now in a duel also.

The Chaos turn was for once rather simple with the Shrine simply moving out of the way of the Dwarf horde and blessing the Warriors with +1AS (2+AS Warriors :D ). Combat went much as it had in previous turns however this time the Sorcerer Lord managed a wound past the Thane's armour. They held again.

Image


Turn 6

Though he possibly regretted not sounding the Dwarf counter-charge last turn, too many Hammerers had died for the Horde to risk it now and so they backed off to avoid overruns. The Grudge Thrower fired at the Shrine again and did a wound. In combat the Hammerers were reduced to a single rank.

In the last turn of the game the Shrine charged the Grudge Thrower and failed. The Marauders cut down the last of the Hammerers and the Thane died defending his banner. The Chaos had been brutalised but may have pulled it back quite a bit with the death of the elite Dwarfs.

Image


Conclusions

After calculating VP at the end of the game I was astounded to see I only lost 11-9; the killing of the Hammerers and Thane really pulled me back a lot of points. As far as the game went, I think my only true mistake was sending the Chosen in so early. Despite the fact that I likely would not have broken the horde, but keeping the Chosen and BSB's points would have won me the game. It might have been better to hang back an extra turn try get in another blessing and dual charge with the Shrine in the flank. I suffered some horrible luck in this game with the Knights in particular. That being said, a needed a loss to balance out the day.

Despite this outcome, I actually moved up a table as Derm though next underneath me on the table had been a few points below me. I was now set to face Nigel Kavanagh and his Daemons in the Battle for the Pass. Again I had an advantage in scenario but as this game showed, that doesn't always mean something.
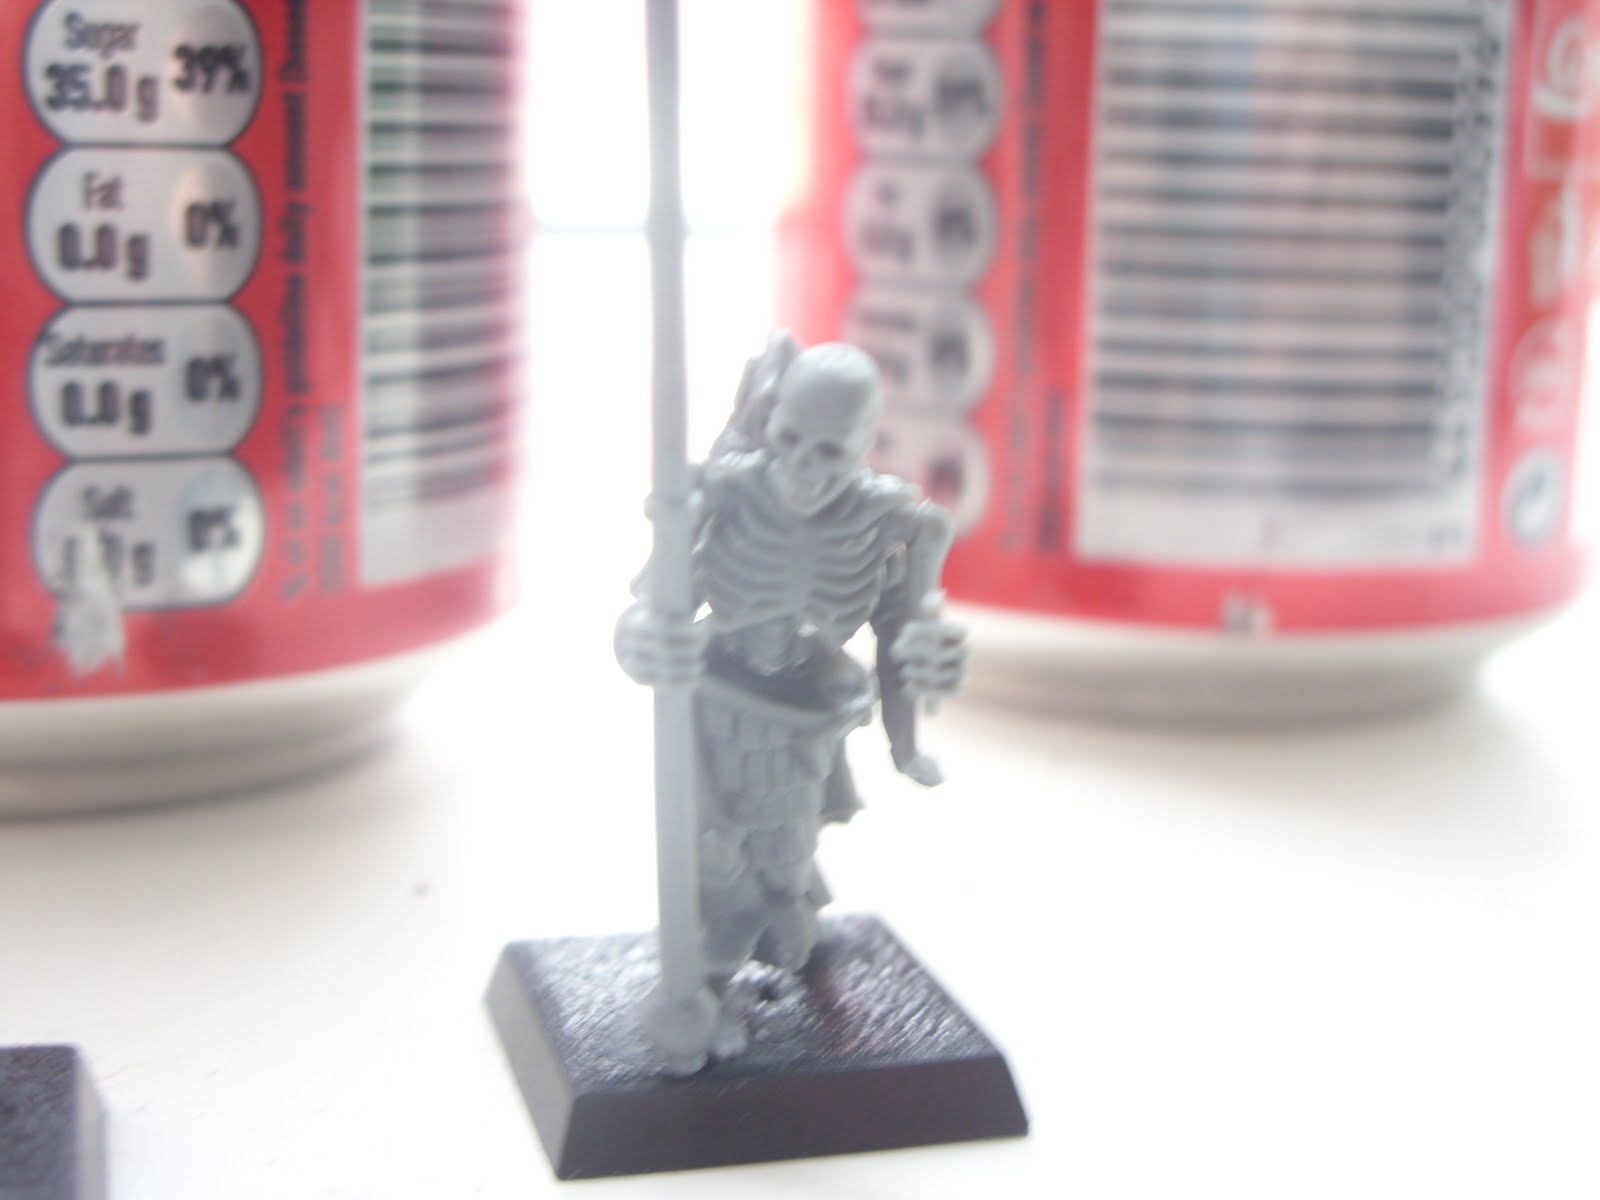