So a bit of good news and a bit of bad news, both related. The invites for the first ever Irish Masters went out this week and since I finished the season at number 4 in the Irish rankings I was one of the invitees.
Unfortunately, due to the current economic climate preventing me from securing a job I am flat broke, and with Warpcon (and the GF's 21st) only two weeks later, I've unfortunately had to decline the invitation.
So where does that leave things for me and my army then? Well the painting I have achieved so far hasn't gone to waste as Warpcon is still on the horizon and I'd like to show up with a fully painted (albeit not finished) Empire army. The extra 2wks takes a lot of weight off my shoulders too allowing me to drop my daily quota of painted models from 3 down to 2.
That being said, I am still disappointed that I won't be attending and thus I will be gunning for another spot at the 2011 Masters. I just hope the experience of this first year will mean that next year's masters will have a much greater period of preparation and notice so that those of us who have to travel far will be able to get our affairs in order.
Wednesday, December 29, 2010
Monday, December 27, 2010
A batch of festivity...
I hate batch painting! It probably has something to do with doing the same little tedious task over and over and over...you get where this is going. That being said, with the Masters quickly approaching (3wks and counting or thereabouts) I don't have much choice but to partake in such things. Christmas has provided me with quite an amount of free time in which to paint. Below you can see what I've gotten done over the last few weeks. Keep in mind all but the Steam Tank is only painted to a base tabletop quality with only basecoats and the odd bit of shading done for the most part.


Friday, December 17, 2010
Stupid Knife-ears...
On the painting front for this week I have another 10 Flagellants half done, 2 more Greatswords finished, 5 more Greatswords undercoated and ready for painting, and a finished and perfected Steam Tank. Pictures to come soon (camera issues).
In the meantime we've been practicing weekly at the club on Monday nights and it has been awhile since I posted a battle report, so I have decided to present the report of Monday nights game against Kevin's High Elves. He tried out a new list for this game which I felt was much more in tune than his previous lists, and performed very well despite that fact that he was only testing out new lores. Both lists can be seen below.
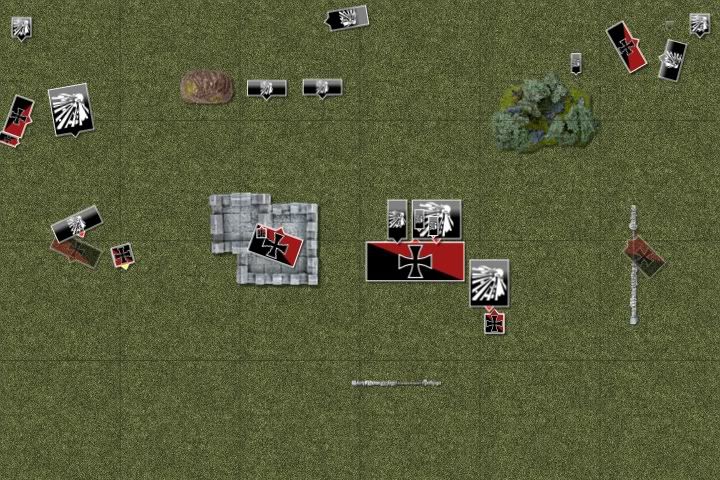
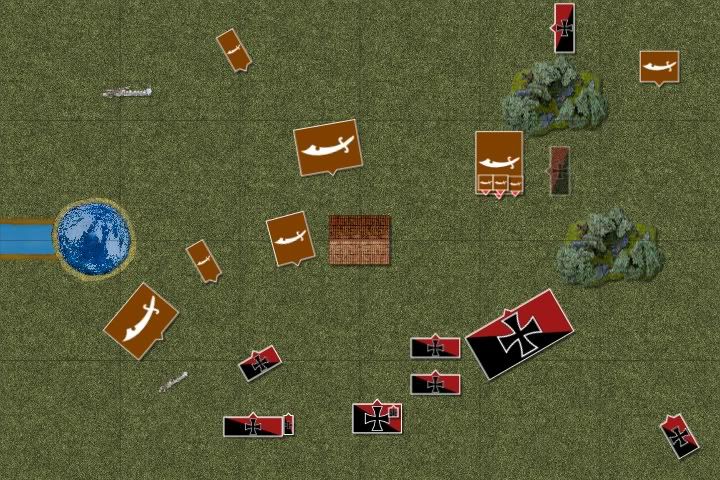
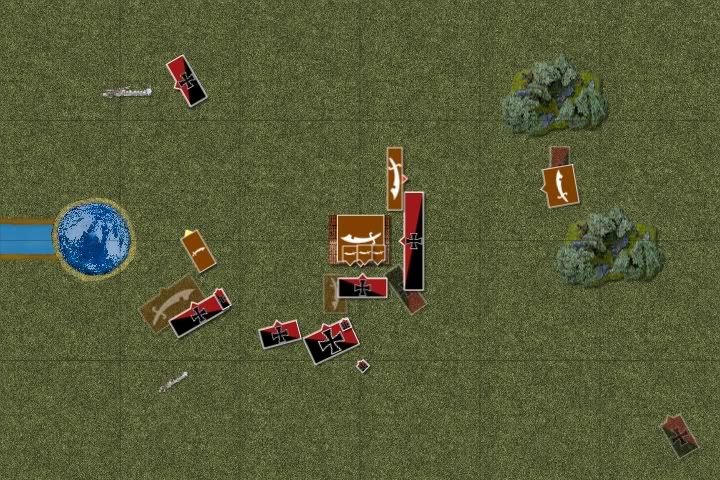
We opted for a Battleline scenario so Kevin could get a better feel for his new list. My Life wizard got Flesh to Stone, Shield of Thorns, Regrowth, and Dwellers Below. His Shadow got The Withering, Penumbral Pendulum, Pit of Shades, and Okkam's Mindrazor, his Death got Spirit Leech and Fate of Bjuna while his Fire took a Fireball.
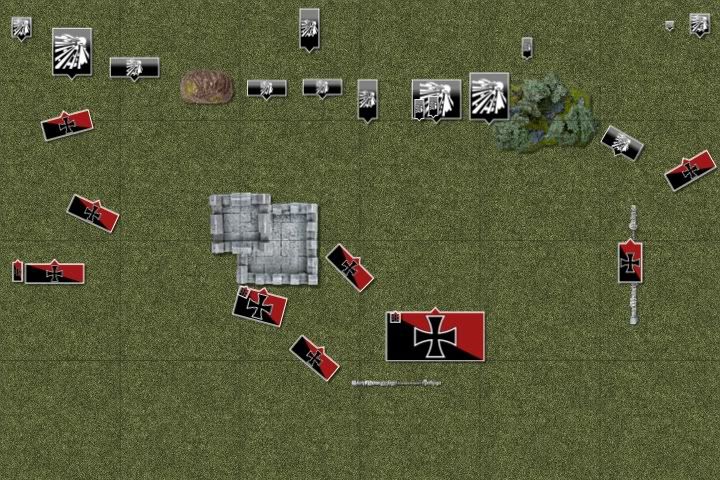
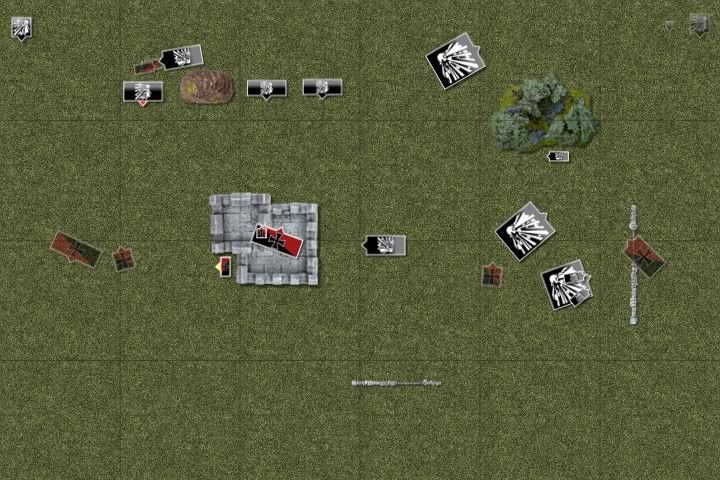
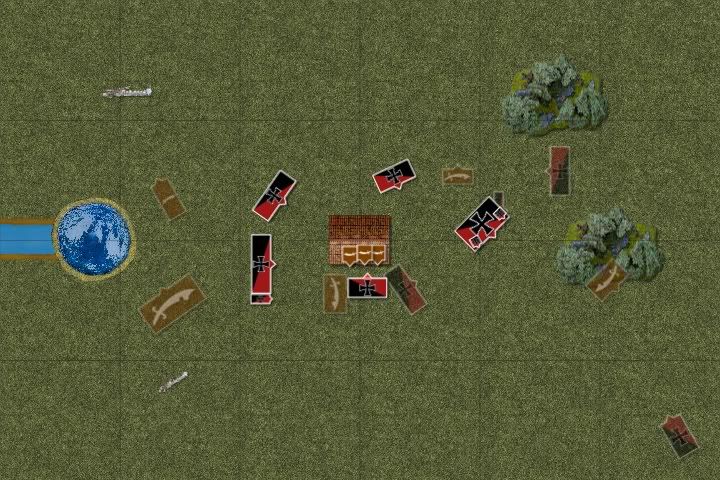
The field can be seen in the deployment diagram below. I spread out wth the bulk in the centre but keeping the Steam Tank as far away from his Level 4 as possible without taking it out of the game. The Knights and Pistoliers spread to either flank to go for the RBTs. Kevin bunched up in the center with the Eagles on the flanks and the RBTs both to the East.

Turn 1
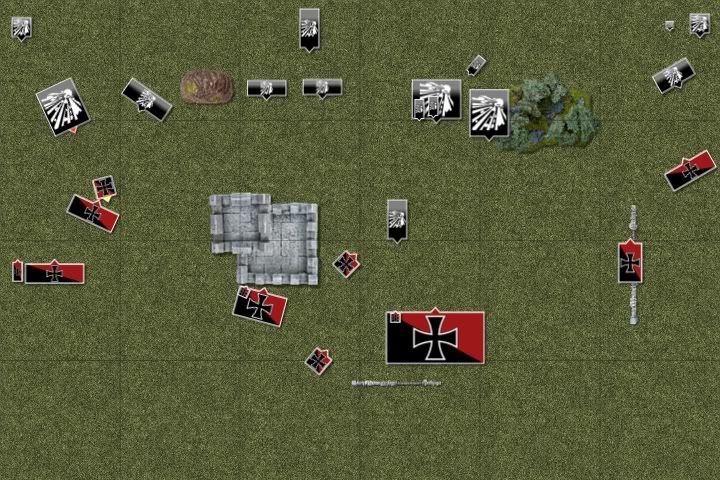
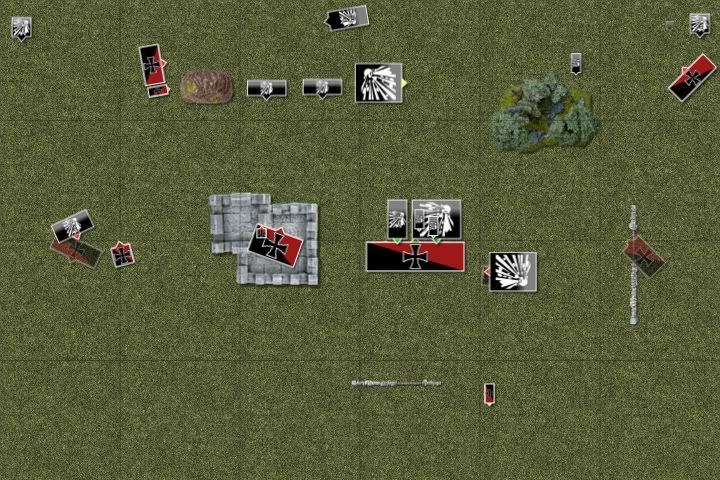
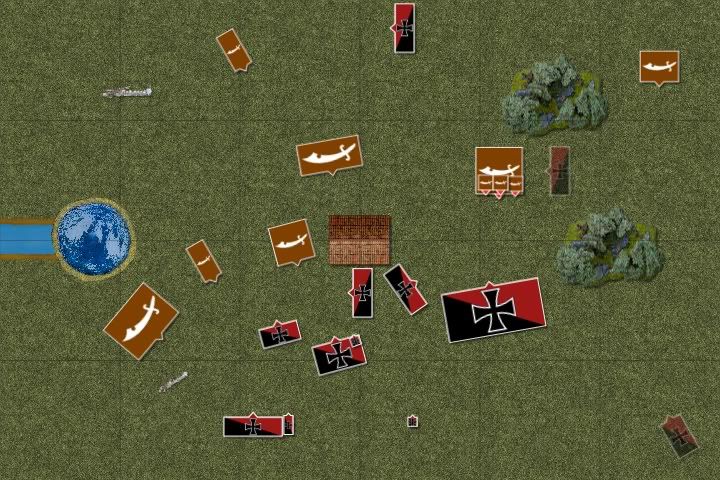
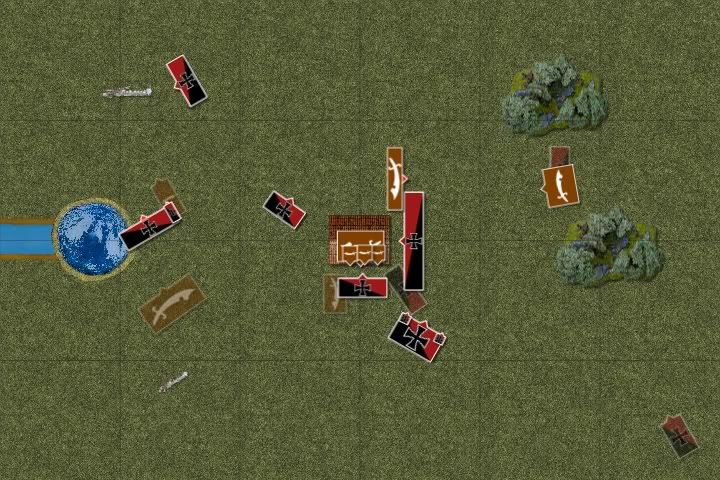
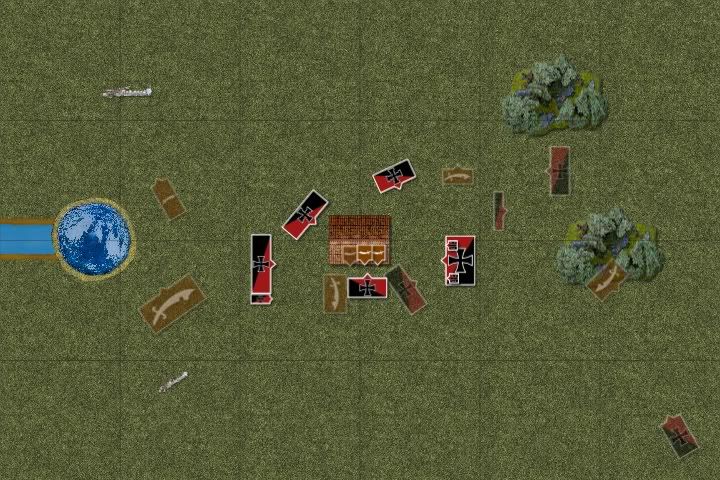
Securing the first turn I decided not to rush the High Elves just yet, waiting to see if I can use he opening run to reduce his ranged attacks enough to allow me to stand back and gun him down. The Pistoliers went full pace to the side of the RBTs and the Steam Tank following suit toward the LSG knowing the quicker it could get locked in combat the quicker it could avoid falling into a big hole. The rest of the army moved at regular pace bar the Flagellants who too ran full pace.
Rolling low on the Winds of Magic and with not much to cast, I attempted to turn the Pistoliers' flesh to stone, and attempted the Speed of Light on the Steam Tank (with the War Altar), however both were dispelled. I had a pretty good shooting phase, taking down an RBT between the Pistoliers and Crossbowmen, and killing 10 LSG with a Mortar shell. Furthermore the second RBT panicked stopping it from shooting up the Pistoliers next turn.

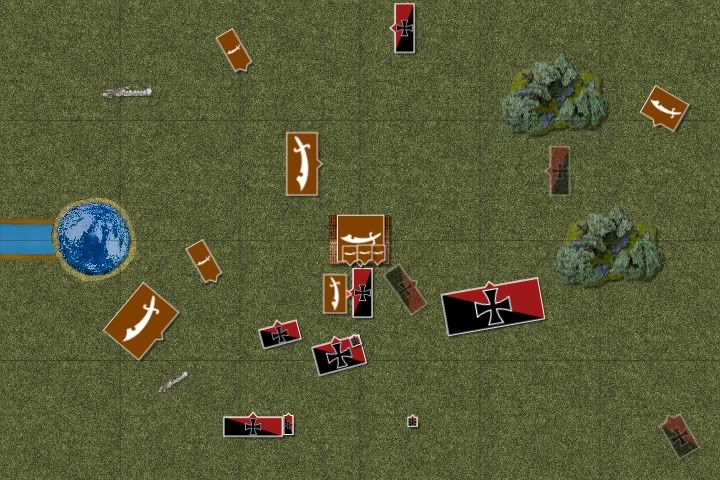
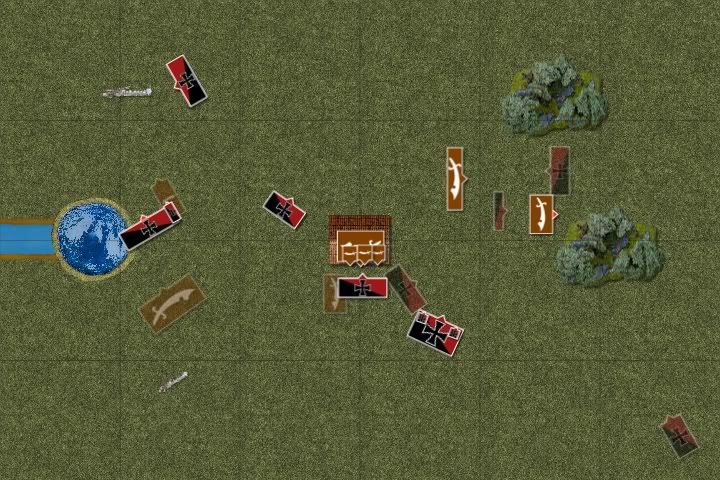
The High Elves played defensively to begin with only the Eagles advancing, each set on charging the Empire artillery. The RBT crew rallied meanwhile. A powerful start to the magic phase saw an iressistable Pit of Shades sink the Steam Tank. This was followed up with a weak shooting phase which only saw 4 Flagellants killed.

Turn 2
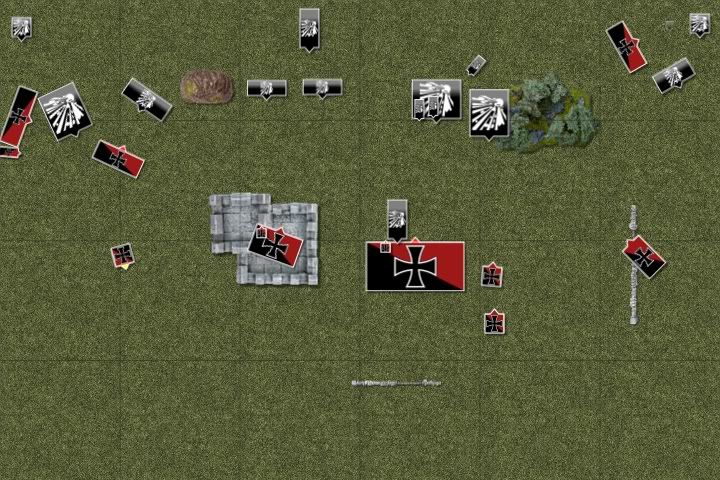
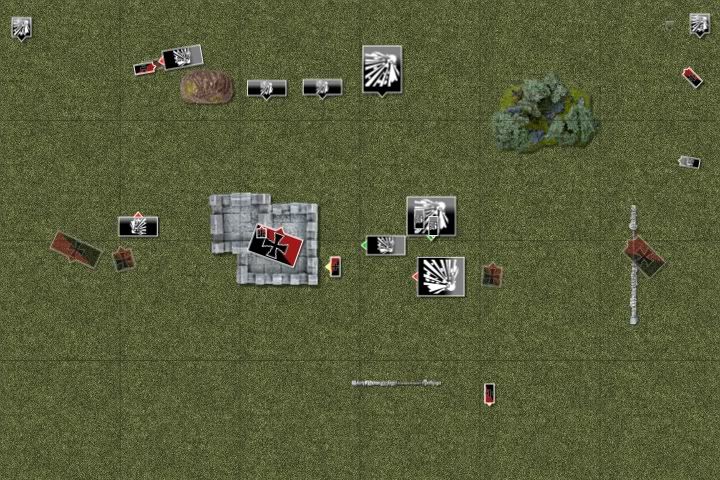
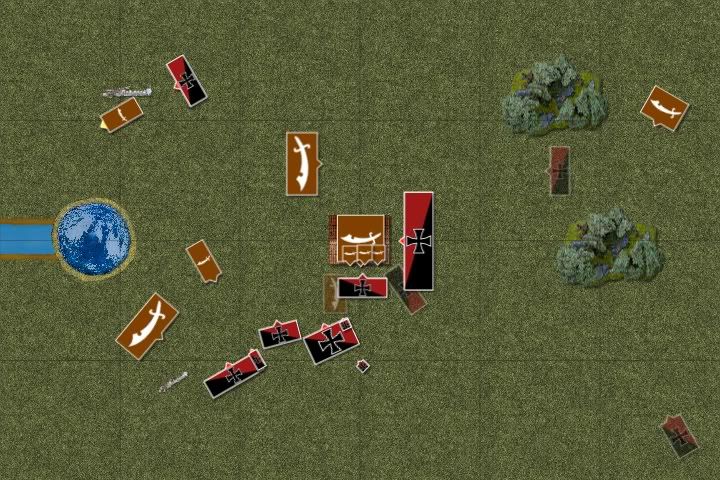
The Pistoliers kicked off turn 2 by charging the RBT before them. At this point I made the mistake of bringing the Knights back to protect the Cannon and turning the Crossbowmen to face the Eagle, trying to bait it to charge. The rest of the army advanced a little quicker with the Flagellants and the War Altar reading charges on the West side.
In the magic phase the wizard managed to revive the 4 fallen Flagellants but that was all. The Eastern Cannon fired at the oncoming Eagle but landed in the mud; the second one could not fire due to my foolish placement of the Knights. One Mortar took out a few Sea Guard however the other misfired.
In combat the crew striking first desaddled one cavalier however the rest easily despatched the war machine and reformed for a better facing.

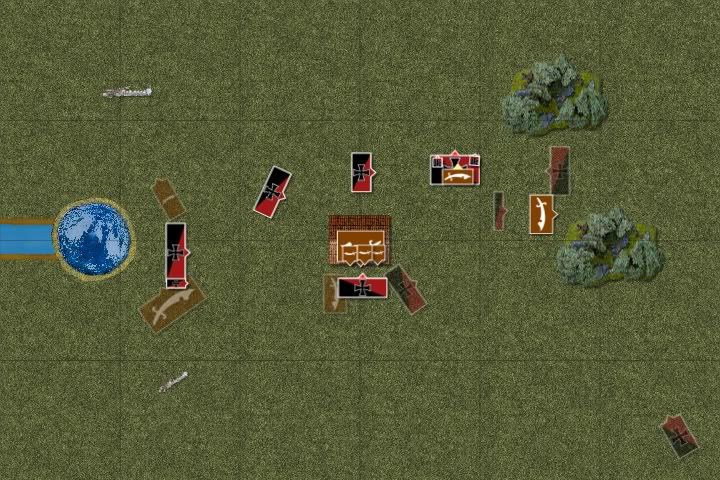
The High Elf Eagle in the East flew over the Crossbowmen and into the Cannon, however the other one could not land and so flew around to charge next turn. The White Lions advanced forward to approach the Flagellants, now confident with the Empire Knights busy elsewhere.
Magic was uneventful, and shooting saw the 4 Flagellants fall again as well as one Greatsword. Combat went as expected with the Cannon crew bolting and the Eagle overunning into the Mortar.

Turn 3
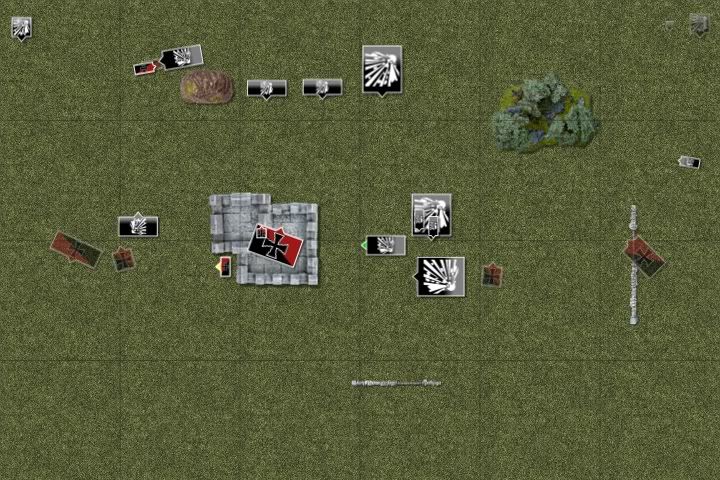
The Empire were determined to inflict heavily casualites this turn and declared a double charge with the War Altar and Flagellants hitting the White Lions. The Knights and Crossbowmen each turned to prepare to charge their respective avian foe, while the Greatswords and Swordsmen manuvered for counter charges next turn. Meanwhile the Pistoliers ran around the back of the High Elf lines.
Magic failed to bring up any results yet again and the Cannon's grapeshot failed to hurt the Eagle. The Pistoliers however managed to remove three LSG. Combat was bloody! The initial impact of the War Altar crushed 4 White Lions under wheel. The remaining Lions subsequently killed 7 Flagellants, whose brothers retaliated with another few dead Lions. Cowardice also ran through the lines as the White Lion Champion rejected the Arch Lector's challenge and moved to the back rank. Despite losing the combat by a good number the Lions held firm, their stubbornness winnign through. Elsewhere the Eagle killed one of the Mortar crew however the remianing two held their ground.

Fearful of the looming Greatswords the main High Elf line backed off instead of counter charging; the Eagle however feared not the Cannon crew and charged. Magic was unsuccessful again with shooting similarly only killing two Greatswords. To further worsen the Elves' woe, both Eagle failed to break their respective war machine enemies, with one even being wounded by the stalwart crew. In the main combat the champion finally stepped up to fight the Arch Lector, wounding the priest before falling. A few more Lions fell however not before killing 5 more Flagellants.

Turn 4
The Empire began counter charges now with the Knights charging one Eagle, the Crossbowmen charging the other, and the Greatswords hitting to now exposed White Lions. The Swordsmen moved up to try use the Wizard's Lifebloom to heal the Arch Lector of his wound, however they placed themselves in grave danger. The Pistoliers stayed stationary to remain a thorn in the elven side.
Magic failed once again. With a spectacular volley of lead the Pistoliers killed 4 more LSG reducing the unit to four men, the Arch Mage, and the BSB. The Mortar, now ready to fire, took its change but scattered back off the board. In combat the Eastern Eagle managed to kill off the Mortar crew and turn to face the Crossbowmen. Its brother however was less forutnate and was skewered on the Knights' lances before the horsemen turned to face the ensueing battle in the centrefield. In said battle the Arch Lector suffered another wound as the two remaining Flagellants and a Greatsword were killed, however the Lions were reduced to just 3 men, though they held once again.

The High Elves were now reeling and panic began to set in throughout the ranks. The bigger LSG block backed off while the smaller one made the mistake of turning to face the Pistoliers, thinking they were safe from a rear charge. The Phoenix Guard however shun a light in the elves' darkened hearts by executing a successful flank charge on the Swordsmen due to their untimely mistake in the Empire turn.
With little else to do the Arch Mage cast Okkam's Mindrazor on the Phoenix Guard with Iressistable Force. The Level 1 attempted then a Fireball to take out the Pistoliers but failed to reach the casting value. Shooting was severly reduced, however the elves made the most of it and slew the Pistoliers. In combat, the Crossbowmen lost a man and wounded the Eagle, locking them in combat. The main combat ended with 2 more Greatswords and the remaining White Lions being killed, the Greatswords reforming now to face down the Arch Mage's bunker. Elsewhere the Phoenix Guard took out 8 Swordsmen, breaking them from combat but failing to catch them.

Turn 5
With great joy the Greatswords charged the rear of the Sea Guard bearing the two characters while the Knights advanced to aid against the Phoenix Guard. The Swordsmen meant to rally and in a desparate gambit the Wizard Lord cast Dwellers Below iressistably, healing the Arch Lector of a wound in the process; however the magical backlash killed 12 of his own men but only 6 Phoenix Guard. In combat the Greatswords easily killed the Sea Guard and the Arch Mage, cutting the BSB down to finish as his tried to defend his banner. The Crossbowmen elsewhere lost more men but managed to cut down the Eagle. With that the High Elves surrended and the day was won for the Empire of man.

Conclusions
So the list I have been running has once again proven effective. One thing I need to focus on however is the Arch Lector. I have found that I am using him too recklessly in games, and he really should only be entering combat against low strength units or units with a lot of characters. His vulnerability still is an issue and makes me believe and need to give him back the Sword of Anti-Heroes.
The High Elf list I found to be a lot more challenging and thought Shadow worked well with them. I feel Kevin might have been a little too defensive, and some counter charges in the mid-game might have helped turn the tide.
In the meantime we've been practicing weekly at the club on Monday nights and it has been awhile since I posted a battle report, so I have decided to present the report of Monday nights game against Kevin's High Elves. He tried out a new list for this game which I felt was much more in tune than his previous lists, and performed very well despite that fact that he was only testing out new lores. Both lists can be seen below.
Arch Lector----------------------------------------------------------
War Altar, Great Weapon, Dawn Armour, Van Horstmann's Speculum
Wizard Lord [ Level 4 ]
Lore of Life, Talisman of Preservation, Seal of Destruction
Captain
Battle Standard Bearer, Armour of Meteoric Iron, Sword of Might, Ironcurse Icon
27x Greatswords
Full Command
Great Cannon
Great Cannon
Mortar
Mortar
5x Pistoliers
24x Swordsmen [ 12x Crossbowmen ]
Full Command
10x Knights
Standard Bearer, Musician, Steel Standard
18x Flagellants
Steam Tank
Arch Mage [ Level 4 ]
Lore of Shadow, Book of Hoeth
Noble
Battle Standard Bearer, Banner of the World Dragon (I think), Dragon Armour, Great Weapon
Mage [ Level 2 ]
Lore of Death, Seerstaff of Saphery
Mage [ Level 1 ]
Lore of Fire, Sigil of Asuryan
21x White Lions
Full Command, Ironcurse Icon
16x Phoenix Guard
Full Command, Banner of Sorcery
28x Lothern Sea Guard
Full Command
20x Lothern Sea Guard
Full Command
Great Eagle
Great Eagle
Reaper Bolt Thrower
Reaper Bolt Thrower
We opted for a Battleline scenario so Kevin could get a better feel for his new list. My Life wizard got Flesh to Stone, Shield of Thorns, Regrowth, and Dwellers Below. His Shadow got The Withering, Penumbral Pendulum, Pit of Shades, and Okkam's Mindrazor, his Death got Spirit Leech and Fate of Bjuna while his Fire took a Fireball.
The field can be seen in the deployment diagram below. I spread out wth the bulk in the centre but keeping the Steam Tank as far away from his Level 4 as possible without taking it out of the game. The Knights and Pistoliers spread to either flank to go for the RBTs. Kevin bunched up in the center with the Eagles on the flanks and the RBTs both to the East.

Turn 1
Securing the first turn I decided not to rush the High Elves just yet, waiting to see if I can use he opening run to reduce his ranged attacks enough to allow me to stand back and gun him down. The Pistoliers went full pace to the side of the RBTs and the Steam Tank following suit toward the LSG knowing the quicker it could get locked in combat the quicker it could avoid falling into a big hole. The rest of the army moved at regular pace bar the Flagellants who too ran full pace.
Rolling low on the Winds of Magic and with not much to cast, I attempted to turn the Pistoliers' flesh to stone, and attempted the Speed of Light on the Steam Tank (with the War Altar), however both were dispelled. I had a pretty good shooting phase, taking down an RBT between the Pistoliers and Crossbowmen, and killing 10 LSG with a Mortar shell. Furthermore the second RBT panicked stopping it from shooting up the Pistoliers next turn.

The High Elves played defensively to begin with only the Eagles advancing, each set on charging the Empire artillery. The RBT crew rallied meanwhile. A powerful start to the magic phase saw an iressistable Pit of Shades sink the Steam Tank. This was followed up with a weak shooting phase which only saw 4 Flagellants killed.

Turn 2
The Pistoliers kicked off turn 2 by charging the RBT before them. At this point I made the mistake of bringing the Knights back to protect the Cannon and turning the Crossbowmen to face the Eagle, trying to bait it to charge. The rest of the army advanced a little quicker with the Flagellants and the War Altar reading charges on the West side.
In the magic phase the wizard managed to revive the 4 fallen Flagellants but that was all. The Eastern Cannon fired at the oncoming Eagle but landed in the mud; the second one could not fire due to my foolish placement of the Knights. One Mortar took out a few Sea Guard however the other misfired.
In combat the crew striking first desaddled one cavalier however the rest easily despatched the war machine and reformed for a better facing.

The High Elf Eagle in the East flew over the Crossbowmen and into the Cannon, however the other one could not land and so flew around to charge next turn. The White Lions advanced forward to approach the Flagellants, now confident with the Empire Knights busy elsewhere.
Magic was uneventful, and shooting saw the 4 Flagellants fall again as well as one Greatsword. Combat went as expected with the Cannon crew bolting and the Eagle overunning into the Mortar.

Turn 3
The Empire were determined to inflict heavily casualites this turn and declared a double charge with the War Altar and Flagellants hitting the White Lions. The Knights and Crossbowmen each turned to prepare to charge their respective avian foe, while the Greatswords and Swordsmen manuvered for counter charges next turn. Meanwhile the Pistoliers ran around the back of the High Elf lines.
Magic failed to bring up any results yet again and the Cannon's grapeshot failed to hurt the Eagle. The Pistoliers however managed to remove three LSG. Combat was bloody! The initial impact of the War Altar crushed 4 White Lions under wheel. The remaining Lions subsequently killed 7 Flagellants, whose brothers retaliated with another few dead Lions. Cowardice also ran through the lines as the White Lion Champion rejected the Arch Lector's challenge and moved to the back rank. Despite losing the combat by a good number the Lions held firm, their stubbornness winnign through. Elsewhere the Eagle killed one of the Mortar crew however the remianing two held their ground.

Fearful of the looming Greatswords the main High Elf line backed off instead of counter charging; the Eagle however feared not the Cannon crew and charged. Magic was unsuccessful again with shooting similarly only killing two Greatswords. To further worsen the Elves' woe, both Eagle failed to break their respective war machine enemies, with one even being wounded by the stalwart crew. In the main combat the champion finally stepped up to fight the Arch Lector, wounding the priest before falling. A few more Lions fell however not before killing 5 more Flagellants.

Turn 4
The Empire began counter charges now with the Knights charging one Eagle, the Crossbowmen charging the other, and the Greatswords hitting to now exposed White Lions. The Swordsmen moved up to try use the Wizard's Lifebloom to heal the Arch Lector of his wound, however they placed themselves in grave danger. The Pistoliers stayed stationary to remain a thorn in the elven side.
Magic failed once again. With a spectacular volley of lead the Pistoliers killed 4 more LSG reducing the unit to four men, the Arch Mage, and the BSB. The Mortar, now ready to fire, took its change but scattered back off the board. In combat the Eastern Eagle managed to kill off the Mortar crew and turn to face the Crossbowmen. Its brother however was less forutnate and was skewered on the Knights' lances before the horsemen turned to face the ensueing battle in the centrefield. In said battle the Arch Lector suffered another wound as the two remaining Flagellants and a Greatsword were killed, however the Lions were reduced to just 3 men, though they held once again.

The High Elves were now reeling and panic began to set in throughout the ranks. The bigger LSG block backed off while the smaller one made the mistake of turning to face the Pistoliers, thinking they were safe from a rear charge. The Phoenix Guard however shun a light in the elves' darkened hearts by executing a successful flank charge on the Swordsmen due to their untimely mistake in the Empire turn.
With little else to do the Arch Mage cast Okkam's Mindrazor on the Phoenix Guard with Iressistable Force. The Level 1 attempted then a Fireball to take out the Pistoliers but failed to reach the casting value. Shooting was severly reduced, however the elves made the most of it and slew the Pistoliers. In combat, the Crossbowmen lost a man and wounded the Eagle, locking them in combat. The main combat ended with 2 more Greatswords and the remaining White Lions being killed, the Greatswords reforming now to face down the Arch Mage's bunker. Elsewhere the Phoenix Guard took out 8 Swordsmen, breaking them from combat but failing to catch them.

Turn 5
With great joy the Greatswords charged the rear of the Sea Guard bearing the two characters while the Knights advanced to aid against the Phoenix Guard. The Swordsmen meant to rally and in a desparate gambit the Wizard Lord cast Dwellers Below iressistably, healing the Arch Lector of a wound in the process; however the magical backlash killed 12 of his own men but only 6 Phoenix Guard. In combat the Greatswords easily killed the Sea Guard and the Arch Mage, cutting the BSB down to finish as his tried to defend his banner. The Crossbowmen elsewhere lost more men but managed to cut down the Eagle. With that the High Elves surrended and the day was won for the Empire of man.

Conclusions
So the list I have been running has once again proven effective. One thing I need to focus on however is the Arch Lector. I have found that I am using him too recklessly in games, and he really should only be entering combat against low strength units or units with a lot of characters. His vulnerability still is an issue and makes me believe and need to give him back the Sword of Anti-Heroes.
The High Elf list I found to be a lot more challenging and thought Shadow worked well with them. I feel Kevin might have been a little too defensive, and some counter charges in the mid-game might have helped turn the tide.
Monday, December 6, 2010
Progress?
So I've finally finished painting some models for my Empire army, or rather, 'finished' painting them. What I mean by this is they are painted to a basic tabletop standard without highlighting which unfortunately is all I can get done with the time I have until the masters in January (assuming I am still a qualifier in 3.5wks). So far I have finished the Greatsword champion and 7 Flagellants and despite the unfinised-ness I have forced myself to be happy with them. Now its onto the Steam Tank, who will still get the 5 star treatment, deadline looming or not.
Wednesday, November 24, 2010
NWG 2010 - A time of Chaos - Game 5 + Conclave short report + The Road Ahead
Right I really need to get back and wrap this up so I'm gonna make this quick; I've also forgotten some of the finer details so cannot produce accurate maps. Anyway, game 5 was against Brian McKenzie and his throng of Dwarfs. It was a pretty tough list, boasting a scout Lord with a big unit of Rangers, a BSB and Runesmith in a large unit of Ironbreakers, a big unit of Warriors, unit of Quarellers, two Cannons, two Grudge Throwers, an Organ Gun, and a Master Engineer. This was a pitched battle and he deployed heavily to his left flank. I put most of my guys opposite so as to hit combat ASAP with a unit each of Knights and Horsemen out to the opposite flank to sweep around.
Got a lucky first turn with minimal damage from war machines and despite him charging the Horsemen with the Rangers and Lord one survived and held for two rounds. I surged forward to get in quickly with the Horde angling to charge the Rangers next turn. Unfortunately the horde lost 30 men to Grudge Throwers before they got the charge and were easy prey then in combat for the Lord's unit. The Knights fought a double combat against the Ironbreakers and Quarellers which after about 4 rounds resulted in the Ironbreakers and Quarellers being wiped out along with the Nurgle Knights while the Khorne Knights held and the BSB and Runesmith fled the table.
The Warriors were in the building at this point and were suffering a lot of war machine fire, but at the same time were deterring it from my other units while not taking much damage due to the Ironcurse Icon. Elsewhere a stalwart Cannon was holding up both the Horsemen and the Hounds for most of the game before falling. The Hellcannon got two shots only during the game, but they killed the Organ Gun and a Grudge Thrower respectively.
By the end of the game, the last of the Khorne Knights were trying to mop up the last two machines and the Engineer while the remnants of the Warriors and Lord were hiding behind a building while using magic to try and smash his Lord's unit. At this point the Exalted has also ran the length of the board and not left yet. An unlucky last turn say the Knights bounce off a Cannon and bad Strength rolls on FF and Gateway leave the Lord's unit with a few men left; a 12-8 win for Chaos.
With this finish I ended the tournament of 34 players in 14th place, which I was happy with. I had 5 good games and was fortunate not to lose to a single spell as other were unlucky to suffer. I learned a lot about my list and have since changed it accordingly as can be seen in my Conclave report below. It was top notch event and I look forward to next year. Again sorry about the rushed ending but I've been very busy as of late and didn't want to leave yet another report unfinished.
-----------------------------------------------------------------------
Right so since I finished my NWG report really late I didn't get a chance to do a full on report of this one so I'll be doing a shorter style report. Decided since my Empire was still bare plastic and had a few models that wer only legs I'd stick to Chaos for one more run and try out some rulebook lores and more infantry. After some shuffling with Shadow I opted for Death and a Chosen fun-bus. Was running Level 4 Death with various items of protection, Tzeentch BSB with protection (no condoms were used in the making of this report thank you very much), 10 Nurgle Knights, 14 Tzeentch Chosen, 14 Tzeentch Warriors, 40 Khorne Marauders, 2x5 Horsemen, 5 Hounds, Shrine and Hellcannon.
Game 1 - Fergus Byrne - Dwarfs
Got paired with Fergus first turn. He had a solid list with Anvil, BSB, Runesmith, a billion and one scrolls, 2x25 Hammerers, 20 Warriors, 3x10 Thunderers, 2 Grudge Throwers, and Organ Gun. This was watchtower and since he had an Anvil of Vaul (magical flaming attacks) in his deployment zone he bunkered his war machines and guns around that with the Anvil hiding behind it. The rest of his big blocks and one thrower went in the centre then to take on the building. I got the tower starting my Warriors in it and weighing heavily on the right flank to stay as far away from his shooting as possible while using the tower as cover. If I could sweep through the right flank across his lines far back I would get the war machines anyway, but put some Horsemen and the Hellcannon on the left for good measure.
The first 3 turns involved Fergus defending his position with two of the infantry blocks while the third would stand on front of the tower and be Anvil'ed into it after rounds of shooting weakened the Warriors. This failed in turn 2 and come turn 3 the Knight had worn through the 2nd Hammerer unit to hit the main one in the flank. The Anvil had also been caught by the Horsemen by this stage, who held it up for two rounds before dying. The Marauders and the Runesmiths Warriors got in a tussle that lasted the game around this point and with only one Chaos Warriors left in the tower he evacuated and hid behind it and the Chosen with Level 4 and BSB moved in instead. This pretty much sealed the game as in the following turn the Anvil blew up and the Shrine bestowed 4+ ward and stubborn on them, making them near impossible to shift. The game ended in turn 5 a 17-3 to me.
Game 2 - Nigel Kavangh - High Elves
Teclis! One character I didn't wanna face. Nigel got a nice deployment zone with two large building to hide behind. His list had Life Teclis, Level 2 Death, 2x20 Sea Guard, 20x White Lions, 15~ Phoenix Guard, RBT, Eagle, 10 Archers, and 5 Dragon Princes. He played pretty defensively as I made a swift advance to try and get into combat. This advance was slowed down when I declared a load of charges and nearly all of them failed. I managed to catch some Sea Guard in a building though two managed to survive the game thanks to a timely Regrowth, and I hit the Lions with the Hounds and Shrine who were beat. The Shrine got away and the Lions hit the Chosen, killing the BSB and butchering the remaining Chosen bar the musician who got away, keeping the victory points secure. The Knights managed to hit Teclis' building bunker but didn't kill enough Phoenix Guard before the last turn to be able to attack Teclis. In the end the only casualties of the game were the Horsemen, the Hounds and the BSB vs the Dragon Princes and the Eagle, and since this was Blood and Glory I sneaked away with only an 11-9 loss. Teclis was luckily not very effective in this game as Dwellers doesn't hurt Chaos so much.
Game 3 - Kevin Rynne - High Elves
More knife-ears! Kev's list was Prince, Level 4 Life, Level 1 Beasts, BSB, 15~ PHoenix Guard, 13 Swordsmasters, 5 Dragon Princes 30 Sea Guard, 20 Archers, and 2 RBTs. This game was meeting engagement, a scenario that suited me greatly so as long as I could get rid of the Swordsmasters early. Kev set-up first and the bad luck began as he started the game with only an RBT, the Dragon Princes, the PGs, and the characters on the board. To make matters worse I stole the first turn and sniped his Level 4 and half the PG immediately. After that it just went downhill for the elves, with the Sea Guard running from the field after a Doom and Darkness/Hellcannon combo, and the SM and DP double charge bouncing off the Chosen and getting counter-charged by the Knights and Marauder horde. By turn 4 only the Archers remained so Kev called it 20-0. All I can say is I've never seen one person get that much bad luck all at once before and I really don't think I deserved such a win at all considering how it went down.
Game 4 - Gerry Nolan - Skaven
The only list over Teclis I really didn't wanna play. Skaven have always been a weak point for me over the years and in 8th edition I have been unable to beat them. Gerry had a Grey Seer, Warlord on litter, BSB, 3 Wizard Engineers, 2 Engineers with fun exploding stuff, 24 Stormvermin, 3x25 Clanrats, 2x25 Slaves, Poison Wind Mortar, Warpfire Thrower, 10 Gutter Runners, Doomwheel, 2 WLCs, and a Plague Claw Catapult. It was Dawn Attack, and Gerry got his 3 war machines bunkered on the hill to his left with the Doomwheel to his right. Everything else went down the centre. I too got a lot to my left with the Horde, Level 4, BSB, Knights, and Horsemen all going there, while the Hounds and Horsemen took the other flank with the rest in the middle.
Starting off the Skaven army trundled forward, and then the Doomwheel misfired while shooting and went diagonally toward my Warriors leaving its flank open to my Knights and saving my Horsemen from being deep fried and crispified. He Scorch'ed some Horsemen and shot up the Hellcannon (killing it) and 2 Knights. From there the Knights and Warriors double charged the Doomwhell who fled and was caught, though this reaction surprised me and left my Warriors' flank open. Horsemen went around flanks on both sides with one charging a the Fire Thrower (which fled). The Chosen and Shrine were left in the centre alone to trudge on as the Horde on the left flank had to stay within the building to avoid too many casualties from the war machines (they would be vital in the late game).
Most of the rest of the game involved a mass melee on the left flank as the Stormvermin with Lord charged the Horsemen and overran into the Knights while the Slaves flanked my Warriors and overran into the Knights' flank. The Knights held up combat long enough for the horde to come safely down and flank the Slaves. In the middle the Shrine used its T6 and saves along with its 5A to hold up Clanrats, losing combats only marginally and holding on long enough to keep two units busy. An Engineers killed 11 Chosen with the Brass Orb with the remaining 3 being forced to charge Clanrats and being flanked by the Grey Seer and his Clanrats. However the Shrine managed to get them the ward and stubborn just on time and the two pronged assualt failed to either kill them or break them until finally they won a combat by killing the BSB in a challenge and the Grey Seer rolled a 12 to break, panicking 3 other units as it ran. A timely Doom and Darkness saw that the Grey Seer did not rally and fled the board and that was pretty much game as the rest of the board was just mop-up sessions; 16-4 to Chaos. For the record, this was the most fun game of the tourney with a lot of really interesting situations and outcomes and a lot of back and forward motions vying for power.
Game 5 - Nigel Kavanagh - High Elves
So for the last game I was facing Nigel again. I was in the lead by a solid 10 points which meant Nigel needed a 16-4 win (1500pts+ difference) to win the tournament. We had the same table as last time however I got the side he had last time so he had less places to hide. He deployed mostly around a little watchtower on the left flank in which Teclis' unit sat with a few straggling units off toward the middle. I put some Horsemen, the Hellcannon, and the Warriors with Level 4 nearby in a building of my own opposite, with the rest of the force out of magic range ready to take off stragglers. I didn't want to just run away the whole game to force a draw as I wanted to have a bit of fun, so I decided that I would take the fight to him as long as I could but in a controlled manner. With us weighing heavily on opposite sides my plan was to pick off the stragglers and try work my way in from the side while staying out of Dwellers range with almost everything as long as possible (as my Lord is immune to it).
The first 2 turns were fairly static with no VPs taken from either side, though the Warriors were getting whittled away as were the White Lions. In turn 3 he got a lucky break as just at the point that his shooting and magic brought the mage unit below 25% they panicked (failing a re-rollable 8) and would only rally on double 1; naturally they left the board in the next turn. However in the east I had picked off the Archers with the Knights and the Dragon Princes had bounced off the Chosen who promptly killed them all. By turn 4 I had little hope of winning and so sounded the retreat as my chance was gone now and it was all about survival. Nigel still needed another two units so he pumped magic and shooting into the Chosen and Knights but the Chaos hardiness prevailed and the game ended only a 13-7 to Nigel, me sneaking away with only a minor loss yet again. The game was extremely tense throughout with every detail, move and point mattering. Next to us Gerry needed a 19-1 win to pass me out but Gag managed to steal back the win in the last few turns securing me the top spot.
Was a great tourney and had some great games; cheers to Fergus, Nigel, Kev and Gerry.
---------------------------------------------------------
Right so the tourney season is almost ready to start up again. With no events confirmed (though speculated) between now and the end of January, Warpcon in 10wks will be the start of it all. I've decided to really have a shot at finishing my Empire to at least tabletop standard by then and so have begun so serious work on them. After trying out a previous two lists I've come to really appreciate Mortars and have now taken a second one in my list over the second unit of Crossbows that I used to have. Below is the list I plan on taking at this moment.
Arch Lector
War Altar, Dawn Armour, Sword of Anti-Heroes, Van Horstmann's Speculum
Wizard Lord [ Level 4 ]
Talisman of Preservation, Seal of Destruction
Captain
BSB, Armour of Meteoric Iron, Sword of Might, Ironcurse Icon
Great Cannon
Great Cannon
Mortar
Mortar
27x Greatswords
Full Command
5x Pistoliers
24x Swordsmen [ 12x Crossbowmen ]
Full Command
18x Flagellants
10x Knights of the Empire
Standard Bearer, Musician, Steel Standard
Steam Tank
Monday, November 1, 2010
NWG 2010 - A time of Chaos - Game 4
Bright and way too early Sunday morning we arrive in to the surprise that most of the gamers are actually on time. Strange occurance by anyone's watch on the second day.
So as I said previously, my win over Jarvis put me up to table 5 I think to face the forces of the Empire led by my old arch-nemesis Rob Gleasure. I had very little confidence going into this game to tell the truth; not only did Rob have a hard as nails list which he knew how to use but the eternal balance of victories between us was currently in my favour thus I owed him a win. Together these things were surely going to make me slip up.
Rob rolled up Harmonic Convergence, Wind Blast, Urannon's Lightning(Thunder)bolt, and Comet of Cassandora while I rolled Flickering Fire, Pandaemonium, Call to Glory, and Gateway (taking Fireball on the Level 1 again). Deployment plus vanguards can be seen below. Note this was a Dawn Attack scenario and I set-up first as well as getting the first turn.

Turn 1
The turn began awry as the Hellcannon rampaged toward the Outriders. The eastern Maruaders moved to take the flank of the Outriders while their western counterparts made a bee-line for the Cannon. The Nurgle Knights and Hounds on the same flank moved up to try and bait charges and the Marauder horde moved up just enough to stay out of charge range of the Steam Tank. The other Hounds moved within the Tank's range hoping to tempt it to come at them where the Knights were waiting; this was also an attempt to tempt Rob into using 5 Steam Points and hope for a lucky 6. Finally the Warriors moved up to take the building next turn.
Magic managed to do nothing and in shooting only a Halberdier and an Outrider were taken down by respective axes of the Horsemen units.
The Halberdiers in the west charged the Horsemen who stood and shot taking down another one. No other charges were declared as the Tank didn't take the bait; it instead moved up 12" on 4 steam points. The Outriders moved to block the charge path of the Horsemen while the Knights shuffled by a better charge path.
Magic was largely uneventful with only Birona's Timewarp going off on the ICK. Shooting was a little move successful with three Hounds shot down by some crossbows, a huge amount of Marauders killed by an exloding pigeon and 3 Khorne Knights killed by a cannonball. In combat two more Halberdiers were cut down as were 3 Horsemen, with the remaining 2 breaking but outrunning the chasing enemy.
Turn 2
Not so eager to sacrifice so many points by sending the two remaining Khorne Knights into the Steam Tank, the horde went in instead with the Hounds and Knights running around the back of the combat. This was my first huge mistake as I backed up my lines in one fell swoop. The Warriors moved into the building as the other Hounds failed a charge on the smaller Knight unit. The Nurgle Knights swept down the flank to sweep across the Emprie lines next turn, careful to keep at an angle so as not to be totally wiped out by the Cannon. Elsewhere the eastern Horsemen moved around the threaten the Engineer as the western ones kept fleeing.
Yet again the Empire easily dispelled the Chaos magic with their extra 3 dispel dice and the Hellcannon missed. The Horsemen had more luck, killing the Engineer with their axes. In combat the horde did one wound to the Tank and that was that.
The Empire turn put a huge turn around early on in the game with some key charges being made. The Halberderies started with a mammoth charge into the two Hounds while next to them the Timewarped Knights easily hit the Marauders. Elsewhere the smaller Knight unit charged the Hounds who fled; however they were cut down allowing the Knights to reform toward the Horsemen. Strangly the western Halberdiers stayed put with their flank exposed while the two lone characters moved in position. The movement phase rounded out with the Outriders yet again blocking the charge path of the Horsemen though they knew this time was likely their last.
In what would become a trend for the Empire magic phase the Arch Lector got off Timewarp on the ICK but that was all. Shooting hurt the Chaos forces yet again, with a Warrior killed by a bolt and a cannonball smashed the Hellcannon to little daemonic bits. The second cannon only managed to kill two Nurgle Knights thanks to their positioning and them being partly within the 12" + bounce threshold.
In an unlikely turn of events the Exalted Champion fluffed all his attacks in his challenge with the Empire BSB and was killed by the lowly hero of man. The Marauders managed to fell two Knights but suffered several casualties in return, losing the combat and their frenzy. The Halberdiers easily chewed up the Hounds and hit the Khorne Knights head on.
Turn 3
The Nurgle Knights did not hesitate the hit the side of the Halberdiers who fled. Because of their positioning they landed in impassable terrain, thus bouncing out the other side where they were inside a friendly unit, thus bouncing out the other side, and then yet again landing in another friendly unit meaning they were well out of the Knights' reach who had to stop at the impassable terrain. On the other flank the Horsemen charged the helpless Outriders; their brethren rallied.
In magic a Flickering Fire took down 4 Crossbowmen and Pandaemonium went up like a charm. In combat the grind continued with two more ICK going down and the BSB getting wounded however the Marauders numbers were depleting much faster. In another surprising turn of event the Khorne Knights fluffed only killing 2 Halberdiers who in turn killed one Knight and broke the other, opting to restrain test so as the reform and flank the Marauders. Elsewhere the Horsemen easily beat and broke the Halberdiers and reformed to face the Cannon and Wizard Lord.
In turn 3 the Empire's fortunes did not waver. The Arch Lector made a massive 18" charge to hit the Nurgle Knights while the Halberdiers hit the horde's flank. The other Hlaberdiers rallied while the Wizard Lord managed to march past the Marauders. The smaller Knight unit charged the Horsemen in the west also.
In magic no spells got off however the Wizard Lord still rolled no doubles despite Pandaemonium being up. In shooting the Crossbows shot all their bolts at the building but failed to wound the Warriors. The eastern cannon fired grapeshot killing 3 Horsemen while the wetsern Cannon misfired, stopping it from shooting next turn.
In combat the Marauders nerve finally failed and they broke from combat though they managed to escape capture. Elsewhere the War Altar's impact hit killed off all but the Nurgle Champion who was subsequently challenged and locked in a stalemate with the Arch Lector. Things were looking dire for Chaos.
Turn 4
There was little the Chaos forces could do at this point however the Dark Gods' followers never give up. The now lone Horseman charged the Great Cannon in the east as the lone Khorne Knight fled the table and the Maruaders fled past the building unable to rally. The Sorcerer Lord desparatly tried to take some points back with magic but only managed to kill a single Knight. Elsewhere the Nurgle Knight Champion was slain by the Arch Lector leaving the magistrar alone with the Exalted Hero. The lone Horseman faired better, killing two crew and pursuing the last off the board.
The Empire generals called for the army to begin cleaning up the stragglers and so the ICK and Halberdiers began to move toward to North-Eastern corner. The small Knight unit hit the BSB in the flank with a long charge as the Steam Tank stayed static and the Wiazrd Lord continued to move out of harm's way.
The assault on the survivors began as the Crossbows and the Steam Tank's cannon collectively fired at the building slaying 4 Warriors. In combat the Chaos BSB was finally borken and cut down as he defended his banner, leaving the Knights free to reform to face the fleeing Marauder survivors.
Turn 5
The lone Horseman returned to the battle to see the might of the Empire bearing down on him. He opted to stay in the corner as far away from them as possible. Meanwhile the Marauder continued to flee and I continued to keep making my usual mistake of playing my Warriors too passively. The Sorcerer Lord made a pass at sucking the Steam Tank into the Warp but failed.
In the Empire turn the warriors continued toward the Maruaders on both flanks as the cannons and crosswbows continued to bare down on the Warriors garrisoning the building; another 5 were killed.
Turn 6
The Chaos turn was quick consisting of the Marauders continuing to flee and the Lord continuing to fail at casting magic. To round out the game the Maruader horde stragglers were caught and killed by the Knights as the rest of the Warriors were killed. The lone Horseman and the Lord managed to survive.
Conclusions
Some good luck on Rob's part, some really bad play on my part, and some well deserved carma and this game was a well earned 18-2 to Rob. What can I say, I sucked! Risking bearing my flank to a Cannon just for a flank charge, backing up my lines with the horde, and passively playing my Warriors were my greatest faults. There's not much else to say, fair play Rob.
This loss saw me go down to table 8 to face Dwarfs and their not so bearded general Brian McKenzie. Stay tuned.
So as I said previously, my win over Jarvis put me up to table 5 I think to face the forces of the Empire led by my old arch-nemesis Rob Gleasure. I had very little confidence going into this game to tell the truth; not only did Rob have a hard as nails list which he knew how to use but the eternal balance of victories between us was currently in my favour thus I owed him a win. Together these things were surely going to make me slip up.
Arch Lector
War Altar, Great Weapon, Van Horstmann's Speculum, Armour of Meteoric Iron
Wizard Lord [ Level 4 ]
Lore of Heavens, Talisman of Preservation, Seal of Destruction, Barded Warhorse
Captain
BSB, Barded Warhorse, Sword of Might, Talisman of Endurance, Full Plate Armour
Warrior Priest
Barded Warhorse + ???
Master Engineer
Pigeon Bombs
8x Knights of the Inner Circle
Full Command
Great Cannon
Great Cannon
5x Outriders
30x Halberdiers
Full Command
30x Halberdiers
Full Command
10x Crossbowmen
10x Crossbowmen
5x Empire Knights
Standard Bearer, Musician
Steam Tank
Rob rolled up Harmonic Convergence, Wind Blast, Urannon's Lightning(Thunder)bolt, and Comet of Cassandora while I rolled Flickering Fire, Pandaemonium, Call to Glory, and Gateway (taking Fireball on the Level 1 again). Deployment plus vanguards can be seen below. Note this was a Dawn Attack scenario and I set-up first as well as getting the first turn.
Turn 1
The turn began awry as the Hellcannon rampaged toward the Outriders. The eastern Maruaders moved to take the flank of the Outriders while their western counterparts made a bee-line for the Cannon. The Nurgle Knights and Hounds on the same flank moved up to try and bait charges and the Marauder horde moved up just enough to stay out of charge range of the Steam Tank. The other Hounds moved within the Tank's range hoping to tempt it to come at them where the Knights were waiting; this was also an attempt to tempt Rob into using 5 Steam Points and hope for a lucky 6. Finally the Warriors moved up to take the building next turn.
Magic managed to do nothing and in shooting only a Halberdier and an Outrider were taken down by respective axes of the Horsemen units.
The Halberdiers in the west charged the Horsemen who stood and shot taking down another one. No other charges were declared as the Tank didn't take the bait; it instead moved up 12" on 4 steam points. The Outriders moved to block the charge path of the Horsemen while the Knights shuffled by a better charge path.
Magic was largely uneventful with only Birona's Timewarp going off on the ICK. Shooting was a little move successful with three Hounds shot down by some crossbows, a huge amount of Marauders killed by an exloding pigeon and 3 Khorne Knights killed by a cannonball. In combat two more Halberdiers were cut down as were 3 Horsemen, with the remaining 2 breaking but outrunning the chasing enemy.
Turn 2
Not so eager to sacrifice so many points by sending the two remaining Khorne Knights into the Steam Tank, the horde went in instead with the Hounds and Knights running around the back of the combat. This was my first huge mistake as I backed up my lines in one fell swoop. The Warriors moved into the building as the other Hounds failed a charge on the smaller Knight unit. The Nurgle Knights swept down the flank to sweep across the Emprie lines next turn, careful to keep at an angle so as not to be totally wiped out by the Cannon. Elsewhere the eastern Horsemen moved around the threaten the Engineer as the western ones kept fleeing.
Yet again the Empire easily dispelled the Chaos magic with their extra 3 dispel dice and the Hellcannon missed. The Horsemen had more luck, killing the Engineer with their axes. In combat the horde did one wound to the Tank and that was that.
The Empire turn put a huge turn around early on in the game with some key charges being made. The Halberderies started with a mammoth charge into the two Hounds while next to them the Timewarped Knights easily hit the Marauders. Elsewhere the smaller Knight unit charged the Hounds who fled; however they were cut down allowing the Knights to reform toward the Horsemen. Strangly the western Halberdiers stayed put with their flank exposed while the two lone characters moved in position. The movement phase rounded out with the Outriders yet again blocking the charge path of the Horsemen though they knew this time was likely their last.
In what would become a trend for the Empire magic phase the Arch Lector got off Timewarp on the ICK but that was all. Shooting hurt the Chaos forces yet again, with a Warrior killed by a bolt and a cannonball smashed the Hellcannon to little daemonic bits. The second cannon only managed to kill two Nurgle Knights thanks to their positioning and them being partly within the 12" + bounce threshold.
In an unlikely turn of events the Exalted Champion fluffed all his attacks in his challenge with the Empire BSB and was killed by the lowly hero of man. The Marauders managed to fell two Knights but suffered several casualties in return, losing the combat and their frenzy. The Halberdiers easily chewed up the Hounds and hit the Khorne Knights head on.
Turn 3
The Nurgle Knights did not hesitate the hit the side of the Halberdiers who fled. Because of their positioning they landed in impassable terrain, thus bouncing out the other side where they were inside a friendly unit, thus bouncing out the other side, and then yet again landing in another friendly unit meaning they were well out of the Knights' reach who had to stop at the impassable terrain. On the other flank the Horsemen charged the helpless Outriders; their brethren rallied.
In magic a Flickering Fire took down 4 Crossbowmen and Pandaemonium went up like a charm. In combat the grind continued with two more ICK going down and the BSB getting wounded however the Marauders numbers were depleting much faster. In another surprising turn of event the Khorne Knights fluffed only killing 2 Halberdiers who in turn killed one Knight and broke the other, opting to restrain test so as the reform and flank the Marauders. Elsewhere the Horsemen easily beat and broke the Halberdiers and reformed to face the Cannon and Wizard Lord.
In turn 3 the Empire's fortunes did not waver. The Arch Lector made a massive 18" charge to hit the Nurgle Knights while the Halberdiers hit the horde's flank. The other Hlaberdiers rallied while the Wizard Lord managed to march past the Marauders. The smaller Knight unit charged the Horsemen in the west also.
In magic no spells got off however the Wizard Lord still rolled no doubles despite Pandaemonium being up. In shooting the Crossbows shot all their bolts at the building but failed to wound the Warriors. The eastern cannon fired grapeshot killing 3 Horsemen while the wetsern Cannon misfired, stopping it from shooting next turn.
In combat the Marauders nerve finally failed and they broke from combat though they managed to escape capture. Elsewhere the War Altar's impact hit killed off all but the Nurgle Champion who was subsequently challenged and locked in a stalemate with the Arch Lector. Things were looking dire for Chaos.
Turn 4
There was little the Chaos forces could do at this point however the Dark Gods' followers never give up. The now lone Horseman charged the Great Cannon in the east as the lone Khorne Knight fled the table and the Maruaders fled past the building unable to rally. The Sorcerer Lord desparatly tried to take some points back with magic but only managed to kill a single Knight. Elsewhere the Nurgle Knight Champion was slain by the Arch Lector leaving the magistrar alone with the Exalted Hero. The lone Horseman faired better, killing two crew and pursuing the last off the board.
The Empire generals called for the army to begin cleaning up the stragglers and so the ICK and Halberdiers began to move toward to North-Eastern corner. The small Knight unit hit the BSB in the flank with a long charge as the Steam Tank stayed static and the Wiazrd Lord continued to move out of harm's way.
The assault on the survivors began as the Crossbows and the Steam Tank's cannon collectively fired at the building slaying 4 Warriors. In combat the Chaos BSB was finally borken and cut down as he defended his banner, leaving the Knights free to reform to face the fleeing Marauder survivors.
Turn 5
The lone Horseman returned to the battle to see the might of the Empire bearing down on him. He opted to stay in the corner as far away from them as possible. Meanwhile the Marauder continued to flee and I continued to keep making my usual mistake of playing my Warriors too passively. The Sorcerer Lord made a pass at sucking the Steam Tank into the Warp but failed.
In the Empire turn the warriors continued toward the Maruaders on both flanks as the cannons and crosswbows continued to bare down on the Warriors garrisoning the building; another 5 were killed.
Turn 6
The Chaos turn was quick consisting of the Marauders continuing to flee and the Lord continuing to fail at casting magic. To round out the game the Maruader horde stragglers were caught and killed by the Knights as the rest of the Warriors were killed. The lone Horseman and the Lord managed to survive.
Conclusions
Some good luck on Rob's part, some really bad play on my part, and some well deserved carma and this game was a well earned 18-2 to Rob. What can I say, I sucked! Risking bearing my flank to a Cannon just for a flank charge, backing up my lines with the horde, and passively playing my Warriors were my greatest faults. There's not much else to say, fair play Rob.
This loss saw me go down to table 8 to face Dwarfs and their not so bearded general Brian McKenzie. Stay tuned.
Thursday, October 21, 2010
NWG 2010 - A time of Chaos - Game 3
Game 3, table 6, Meeting Engagement. Looking at Derek's list I wasn't as confident as I normally would have been against Ogres as he had the right tools to make this hard for me; fast moving Ironguts to crush my Knights, Scraplauchers for taking out the horde and possibly KB'ing my Knights, and the Gorger coming on backfield to stop the Hellcannon from shooting as well as more KB madness should he manage to intercept the Knights. His list was as follows:
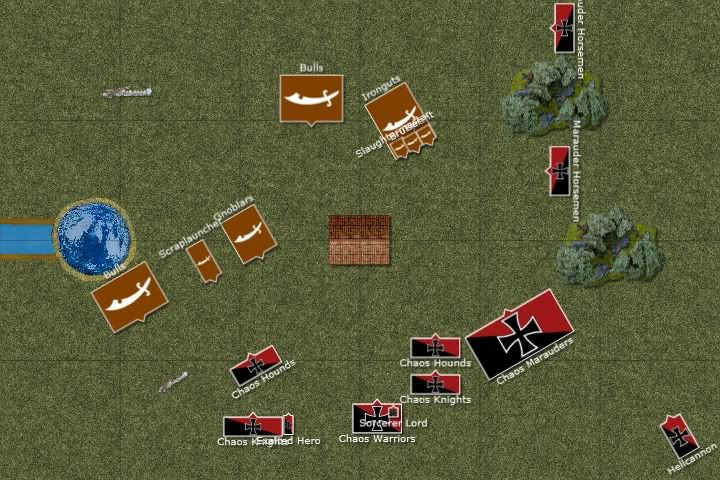
For spells I rolled Flcikering Fire, Pandaemonium, Treason and Gateway (on fire with getting the good four spells). Took Fireball once again on the Level 1. It should be noted for this section of the report that my maps aren't very accurate as the diagonal deployment threw off my recollection considerably. Either way, below is deployment including my vanguards. His Scraplaucher and a unit of 20 Gnoblars were held in reserve as was my Exalted Hero.
Turn 1
The Ogres secured first turn and began with the Gnoblars and Scraplaucher moving onto the board. An immediate charge from the Ironguts saw the Horsemen in trouble. I stood and shot since either way they would be slowed down and not that far out of position. Everything else manuvered and tried to pin me down. Magic wasn't very impressive thanks to a low Winds of Magic roll and the positioning of the Slaughtermaster. One Scraplaucher hit the Warriors but saves were made while the other scattered far, only killing a Hound. In combat the Horsemen were easily killed off and the unit reformed to face my lines.
The Chaos turn started with the Exalted Hero coming onto the field as the Hellcannon managed to be restrained. The forces of destruction manuvered around using the Hounds to attempt to block the Ogre charge paths and hopefully bait for a counter-charge, holding the Nurgle Knights back and hiding the Khorne Knight behind the building to hit the flank should the Tyrant's unit come through to charge the Marauders (who had failed to charge the Tyrant's unit). The remaining Horsemen made a beeline along the Ogre table edge to try charge the Scraplaucher next turn.
Magic proved fruitious with a Bull (from the rearmost unit) and an Irongut being taken out with two more wounds to a second Irongut. The Hellcannon reared for an impressive shot by disappointed the crowd by blowing up instead.
Turn 2
Not falling for the Chaos trickery the Tyrant ordered his unit to move into the building instead of charging, while the lowly Gnoblars instead attacked the Chaos Khorne Knights. The Bulls still didn't want to chance a long charge on the Nurgle Knights so just moved in closer instead, while the rearmost Bulls turned to go after the Marauders. Meanwhile the smaller Gnoblar unit continued to move toward the fighting.
Magic managed to kill off the Hounds but nothing more. Shooting was more successful with the Scraplauchers collectively killing about 18 Maruaders. Predictably in combat the Knights slaughtered tens of Gnoblars while taking no wounds in return, but the steadfast greenskins held.
Dspite being flattened the remaining Marauders charged at the Tyrant occupied building while the Horsemen charged the Scraplauncher in the flank. The Chaos Warriors also charged the Gnoblars in the flank. The Hounds remained still as the Hero moved closer to the army, and the Nurgle Knights failed a charge on the Bulls by about an inch.
Magic only got up a Pandaemonium. In combat the Horsemen did 3 wounds to the SCraplauncher for none in return and broke it though they failed to catch it. In the building combat 4 Marauders were cut down however 2 Ironguts were killed thus winning the combat for the Maruaders though the Ogres held their position. In the final combat the one-sided affair ended as pracdicted with the Gnoblars being wiped out and the two Chaos units reforming to better facings.
Turn 3
The Ogre made a gambit for blood and charged the Nurgle Knights with both the Scraplauncher and the Bulls. The other Bulls charged the Marauders also. eanwhile the second Scraplauncher fled the field as the remaining Gnoblars moved in toward the fight. Magic saw a +1T spell getting off on the Tyrant's unit, wounding the Slaughtermaster. In combat the Mark of Nurgle showed its use as the Ogres struggled to land blows and only managed to kill a single Knight; not a fitting revenge for the 10 wounds dealt by the Knights previously. Both Ogre units broke with Bulls being caught and the Scraplauncher getting away. In the Bulls-Marauders combat the Bulls killed 7 Marauders for 6 wounds in return and the combat brewed on.
Note: The map is wrong for this one, showing only 4 surviving Bulls when there should be a second rank.
The Nurgle Knights started the Chaos turn charging and catching the remaining Scraplauncher while the Warriors manuvered back toward the remaining Ogres. They were then joined by the Exalted Hero who had come on in reserve at the start of the game. The Hounds moved around the building for better options and the Horsemen dawdled forgetting it was their turn. Magic managed to kill off another 1-2 Ironguts before combat in which the Bulls killed another 5 Marauders who failed to perform thanks to losing their frenzy last round; they only did 2 wounds, though held yet again.
Turn 4
The Ogres' only move this turn was to rear charge the Marauders with the Gnoblars. Magic saw the previous +1T spell go down and so the Slaughtermaster put up a new one, taking another wound. He tried to heal the wound but failed. In combat a few Gnoblars went down but the Marauders were hacked down to just 2 men and were broken and caught (the Bulls failing to restrain pursuit).
Not willing to rely on magic too much the Khorne Knights charged the building hoping their flaming attacks could oust the Ogres. The Warriors also hit the flank of the Bulls while the Horsemen and Nurgle Knights came back around toward the battle. Magic was pitiful with the Gnoblars the only possible target for Gateway. In combat the Bulls were easily butchered and cut down, though the Ironguts faired better, hanging on despite suffering casualties for none in return.
Turn 5
With the climax of the battle closing in the Gnoblars legged it while the Slaughtermaster pupped out as much magic as he could to earn points, succeeding in killing a Knight, though losing his +1T test. At this point Derek remembered his Gorger which we had both forgotten all game. In the end however he got insta-fried by Gateway.
The Khorne Knights charged back into the building, and the Sorcerer Lord managed to fry the Gnoblars with a combined arms assault of Flickering Fire and Fireball. The Knights were fortunate that only a single Irongut remained thus the Bruiser and Slaughtermaster finally entered the fight with the Slaughtermaster drawing the short straw and choking it and the Knights managing to pass their saves.
Turn 6
Tension boiled as the Ogre phase was rendered moot due to the lack of magic, drawing the Chaos turn and the final turn of the game in early. In a last display of fireworks the Chaos Sorcerers managed to draw up a full arsenal of 12 power dice and cast Fireball, Flickering Fire and Gateway all successfully into the building. Despite the barrage however the Tyrant and BSB both survived the affair with a single wound each.
Conclusions
Talk about a proper fight! Combats from turn 1 and in every turn there-in apart from Ogre turn 6. Exploding Hellcannons, flying spoons, and Gnoblar shaped jewelry for the Chaos Steeds' horseshoes; this game had all the things a Chaos-Ogres fight should have.
In hindsight I think I played the game well and my choices worked out, though I wonder might it have been better to assault the building with the Khorne Knights a turn earlier. Equally so I thought Derek played the game well also with the only decision I'd question being leaving the uber-killy unit in the building all-game; a mistake I often make with my Warriors as you may recall me stating earlier. That being said, the building really helped those Ogres survive even though they could have helped dish out the pain if played more aggressively.
Rules-wise I forgot to re-roll wounds in the last turn with my Fireball and Flickering Fire which may have killed those two characters, though this is counter balanced by us both playing the flee of the Marauders wrong; they should have ran from the Gnoblars and not the Bulls (thinking 7th ed. *facepalm*) and thus Derek's Bulls got stuck in a bad position. Also I have to attribute quite a bit to the Gorger being forgotten, alas his fate being so cruel and crispy.
All and all a top notch game as is always the case facing Jarvis. This 14-6 win put me up one table for the festivals of old friends to continue facing Rob Gleasure; it seems no tournament would be complete without me and Rob going toe-to-toe. Stay tuned.
Tyrant
Heavy Armour, Thundermace, Talisman of Preservation
Slaughtermaster
Warrior Bane, Ironcurse Icon, Dispel Scroll, Talisman of Endurance
Bruiser
BSB, Heavy Armour, Crown of Command, Gold Sigil Sword
Scraplaucher
Scraplaucher
8x Ironguts
Standard Bearer, Bellower, Banner of Swiftness
9x Bulls
Standard Bearer, Bellower, Ironfists
9x Bulls
Standard Bearer, Bellower, Ironfists
33x Gnoblars
20x Gnoblars
Gorger
For spells I rolled Flcikering Fire, Pandaemonium, Treason and Gateway (on fire with getting the good four spells). Took Fireball once again on the Level 1. It should be noted for this section of the report that my maps aren't very accurate as the diagonal deployment threw off my recollection considerably. Either way, below is deployment including my vanguards. His Scraplaucher and a unit of 20 Gnoblars were held in reserve as was my Exalted Hero.
Turn 1
The Ogres secured first turn and began with the Gnoblars and Scraplaucher moving onto the board. An immediate charge from the Ironguts saw the Horsemen in trouble. I stood and shot since either way they would be slowed down and not that far out of position. Everything else manuvered and tried to pin me down. Magic wasn't very impressive thanks to a low Winds of Magic roll and the positioning of the Slaughtermaster. One Scraplaucher hit the Warriors but saves were made while the other scattered far, only killing a Hound. In combat the Horsemen were easily killed off and the unit reformed to face my lines.
The Chaos turn started with the Exalted Hero coming onto the field as the Hellcannon managed to be restrained. The forces of destruction manuvered around using the Hounds to attempt to block the Ogre charge paths and hopefully bait for a counter-charge, holding the Nurgle Knights back and hiding the Khorne Knight behind the building to hit the flank should the Tyrant's unit come through to charge the Marauders (who had failed to charge the Tyrant's unit). The remaining Horsemen made a beeline along the Ogre table edge to try charge the Scraplaucher next turn.
Magic proved fruitious with a Bull (from the rearmost unit) and an Irongut being taken out with two more wounds to a second Irongut. The Hellcannon reared for an impressive shot by disappointed the crowd by blowing up instead.
Turn 2
Not falling for the Chaos trickery the Tyrant ordered his unit to move into the building instead of charging, while the lowly Gnoblars instead attacked the Chaos Khorne Knights. The Bulls still didn't want to chance a long charge on the Nurgle Knights so just moved in closer instead, while the rearmost Bulls turned to go after the Marauders. Meanwhile the smaller Gnoblar unit continued to move toward the fighting.
Magic managed to kill off the Hounds but nothing more. Shooting was more successful with the Scraplauchers collectively killing about 18 Maruaders. Predictably in combat the Knights slaughtered tens of Gnoblars while taking no wounds in return, but the steadfast greenskins held.
Dspite being flattened the remaining Marauders charged at the Tyrant occupied building while the Horsemen charged the Scraplauncher in the flank. The Chaos Warriors also charged the Gnoblars in the flank. The Hounds remained still as the Hero moved closer to the army, and the Nurgle Knights failed a charge on the Bulls by about an inch.
Magic only got up a Pandaemonium. In combat the Horsemen did 3 wounds to the SCraplauncher for none in return and broke it though they failed to catch it. In the building combat 4 Marauders were cut down however 2 Ironguts were killed thus winning the combat for the Maruaders though the Ogres held their position. In the final combat the one-sided affair ended as pracdicted with the Gnoblars being wiped out and the two Chaos units reforming to better facings.
Turn 3
The Ogre made a gambit for blood and charged the Nurgle Knights with both the Scraplauncher and the Bulls. The other Bulls charged the Marauders also. eanwhile the second Scraplauncher fled the field as the remaining Gnoblars moved in toward the fight. Magic saw a +1T spell getting off on the Tyrant's unit, wounding the Slaughtermaster. In combat the Mark of Nurgle showed its use as the Ogres struggled to land blows and only managed to kill a single Knight; not a fitting revenge for the 10 wounds dealt by the Knights previously. Both Ogre units broke with Bulls being caught and the Scraplauncher getting away. In the Bulls-Marauders combat the Bulls killed 7 Marauders for 6 wounds in return and the combat brewed on.
Note: The map is wrong for this one, showing only 4 surviving Bulls when there should be a second rank.
The Nurgle Knights started the Chaos turn charging and catching the remaining Scraplauncher while the Warriors manuvered back toward the remaining Ogres. They were then joined by the Exalted Hero who had come on in reserve at the start of the game. The Hounds moved around the building for better options and the Horsemen dawdled forgetting it was their turn. Magic managed to kill off another 1-2 Ironguts before combat in which the Bulls killed another 5 Marauders who failed to perform thanks to losing their frenzy last round; they only did 2 wounds, though held yet again.
Turn 4
The Ogres' only move this turn was to rear charge the Marauders with the Gnoblars. Magic saw the previous +1T spell go down and so the Slaughtermaster put up a new one, taking another wound. He tried to heal the wound but failed. In combat a few Gnoblars went down but the Marauders were hacked down to just 2 men and were broken and caught (the Bulls failing to restrain pursuit).
Not willing to rely on magic too much the Khorne Knights charged the building hoping their flaming attacks could oust the Ogres. The Warriors also hit the flank of the Bulls while the Horsemen and Nurgle Knights came back around toward the battle. Magic was pitiful with the Gnoblars the only possible target for Gateway. In combat the Bulls were easily butchered and cut down, though the Ironguts faired better, hanging on despite suffering casualties for none in return.
Turn 5
With the climax of the battle closing in the Gnoblars legged it while the Slaughtermaster pupped out as much magic as he could to earn points, succeeding in killing a Knight, though losing his +1T test. At this point Derek remembered his Gorger which we had both forgotten all game. In the end however he got insta-fried by Gateway.
The Khorne Knights charged back into the building, and the Sorcerer Lord managed to fry the Gnoblars with a combined arms assault of Flickering Fire and Fireball. The Knights were fortunate that only a single Irongut remained thus the Bruiser and Slaughtermaster finally entered the fight with the Slaughtermaster drawing the short straw and choking it and the Knights managing to pass their saves.
Turn 6
Tension boiled as the Ogre phase was rendered moot due to the lack of magic, drawing the Chaos turn and the final turn of the game in early. In a last display of fireworks the Chaos Sorcerers managed to draw up a full arsenal of 12 power dice and cast Fireball, Flickering Fire and Gateway all successfully into the building. Despite the barrage however the Tyrant and BSB both survived the affair with a single wound each.
Conclusions
Talk about a proper fight! Combats from turn 1 and in every turn there-in apart from Ogre turn 6. Exploding Hellcannons, flying spoons, and Gnoblar shaped jewelry for the Chaos Steeds' horseshoes; this game had all the things a Chaos-Ogres fight should have.
In hindsight I think I played the game well and my choices worked out, though I wonder might it have been better to assault the building with the Khorne Knights a turn earlier. Equally so I thought Derek played the game well also with the only decision I'd question being leaving the uber-killy unit in the building all-game; a mistake I often make with my Warriors as you may recall me stating earlier. That being said, the building really helped those Ogres survive even though they could have helped dish out the pain if played more aggressively.
Rules-wise I forgot to re-roll wounds in the last turn with my Fireball and Flickering Fire which may have killed those two characters, though this is counter balanced by us both playing the flee of the Marauders wrong; they should have ran from the Gnoblars and not the Bulls (thinking 7th ed. *facepalm*) and thus Derek's Bulls got stuck in a bad position. Also I have to attribute quite a bit to the Gorger being forgotten, alas his fate being so cruel and crispy.
All and all a top notch game as is always the case facing Jarvis. This 14-6 win put me up one table for the festivals of old friends to continue facing Rob Gleasure; it seems no tournament would be complete without me and Rob going toe-to-toe. Stay tuned.
Monday, October 18, 2010
NWG 2010 - A time of Chaos - Game 2
So game 2 rolls around against Dave Wade and he too is sporting High Elves. This scenario was Blood and Glory which usually I have the advantage in, holding 9 fortitude, however today fortune was not with me as Dave also had 9.
High Magic was a nice change from Life and Death, however it kept me on my toes for this game. He rolled Shield of Saphery, Vaul's Unmaking, Flames of the Phoenix, and Courage of Anaerion on top of Drain Magic. I rolled good for my own spells once again getting Flickering Fire, Pandaemonium, Treason, and Gateway. Deployment for the game can be seen in the below diagram and as per usual contains vanguards also. The High Elves managed to get the first turn.
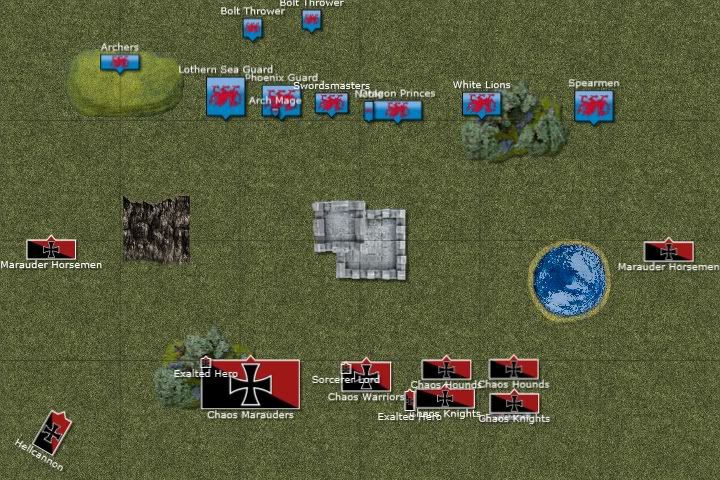
Turn 1
In a very un-Elf-like fashion the High Elf army charged forward, splitting around the building in the centre. Their phase had quite a devastating turnout, with an irresistable Flames of the Phoenix taking out 29 of the Marauders, and Vaul's Unmaking getting a really high roll forcing me to burn my scrolls to preserve my Puppet. Shooting then saw a unit of Horsemen taken out, reducing my fortitude to 8.
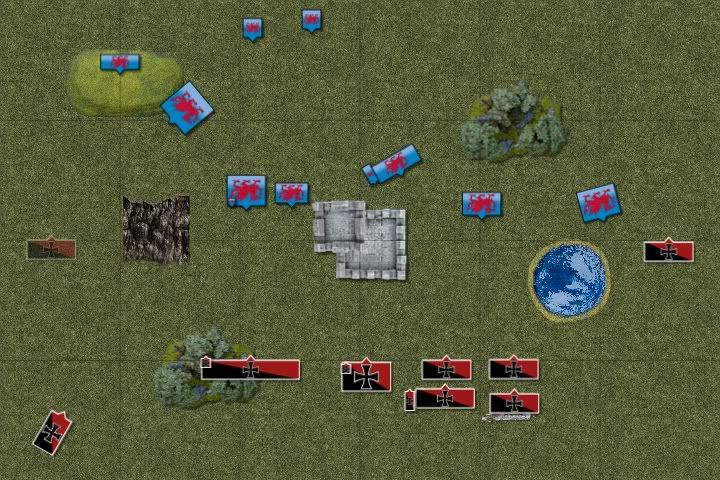
The Chaos turn started off with misfortune as the Hellcannon rampaged and failed to hit anything. No charges were declared and the army manuvered around the High Elves. The Horsemen successfully supressed march blocking and tore up the right flank. Both units of Hounds moved into prime blocking positions while the Knights behind positioned for charges. The Warriors moved up to the building though keeping line of sight on the White Lions. The Maruaders were forced to reform in order to maintain any form of combat ability. Magic only saw one spell getting through, however that Gateway killed 11 Swordsmasters and caused the rest to panic and flee.
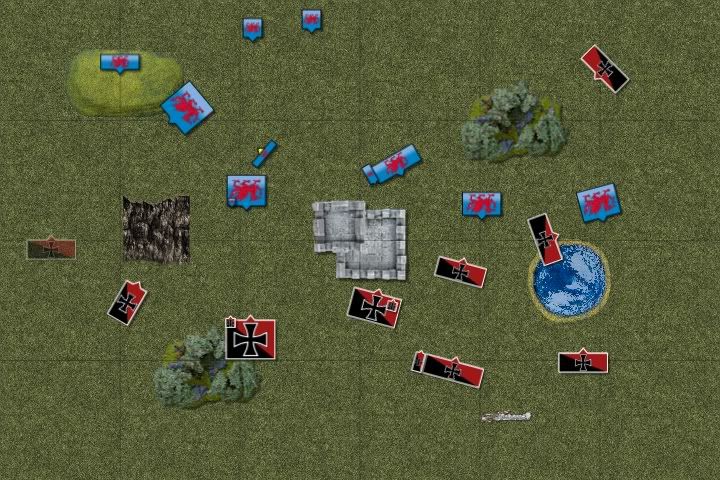
Turn 2
The White Lions reared a charge against the blocking Hounds but the muts fled, enough too to allow the Knights a charge in the Chaos turn. The Spearmen unphased by the silly dogs passed march blocking test and moved onward. The LSG moved up slightly to get shots on the Hellcannon and the PG braced for the charge. The SM rallied also while the Dragon Princes simply wheeled to flank the Chaos Knights should opportunity arise. All magic failed with the Arch Mage even miscasting and taking a wound. The Archers and LSG unloaded their collective 35 shots at the Hellcannon but failed to even dent the hull. The RBTs however managed to wipe out the Horsemen bringing the Chaos fortitude down to 7.
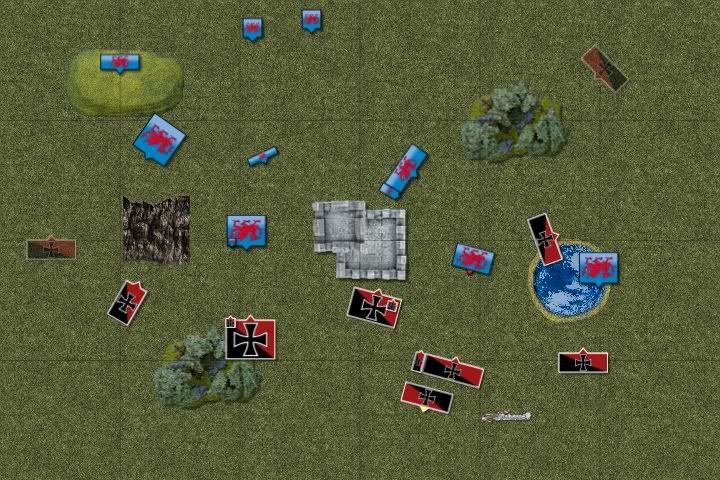
The Chaos army trumped and bellowed and the charge was sounded and almost the entire army engaged. The Khorne Knights hit the Spearmen head on, as did their Nurgle brethren to the White Lions. The Marauders and Hellcannon also collectively charge the Phoenix Guard. The Warriors entered the building while the Hounds stayed with their back to the Phoenix Guard hoping beyond hope to bait them out of position. Magic was unimpressive as Gateway got scrolled. Combat was slightly more successful with 8 Spearmen, 11 White Lions and 8 Phoenix Guard getting killed for only 5 Marauders and a single Knight in return. Unfortunately however none of the units broke (even though the Phoenix Guard were testing on a 3).
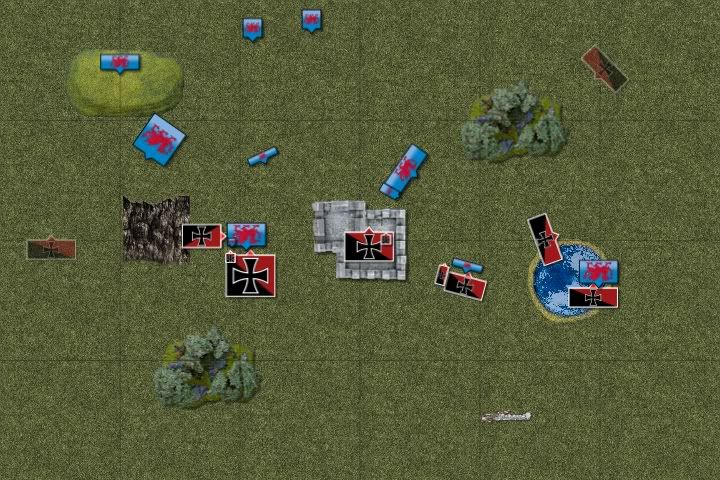
Turn 3
The High Elf turn proved short and bitter. The LSG moved around to rear charge the Hellcannon next turn while the rest of the army stayed still at their vantage points. Magic was rather lacklustre though a crucial Shield of Saphery got through to the Dragon Princes. Combat went rather awry for the Chaos forces. The PG made a rake of successful ward saves, only losing two elves and breaking the Marauders thus being able to turn to face the Hellcannon. This saw Chaos fortitude reduced to 6. The Khorne Knights fluffed on attacks killing only 4 Elves and losing one of their own, though winning the combat. Furthermore the Chaos BSB fluffed up allowing the White Lions to strike down 3 more Knights before getting killed off. This however finally saw the elven fortitude reduced to 8.
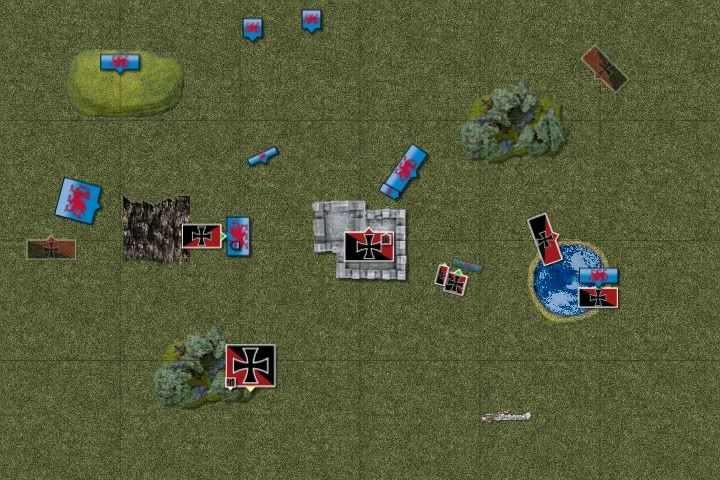
Chaos needed to turn things around. The Nurgle Knights charged headlong into the Dragon Princes, expecting an easy fight should they manage to take out the BSB. The Marauders then failed to rally in the only other act of the movement phase. Magic was rather disappointing once again only killing 3 Swordsmasters; that being said only the champion was left dropping the elven fortitude to 7. In combat the Hellcannon killed another 3 Elves for a wound in return but lost combat. The Knights finally broke through the Spearmen making an impressive overrun, and dropping the elven fortitiude to 6. The Nurgle Knights faired less well however. In a challenge the Knight champion fought the Elven BSB who turned out to only have S4 attacks. Only one wounded and in typical fashion the champion failed his 2+ AS. Furthermore in the combat the S3 Dragon Princes only did one wound to the remaining Knight and he failed his 1+ AS reducing Chaos fortitude to 5, and then to 4 after the BSB was broken (though not before killing 2 Elves; the rest passed their ward saves).
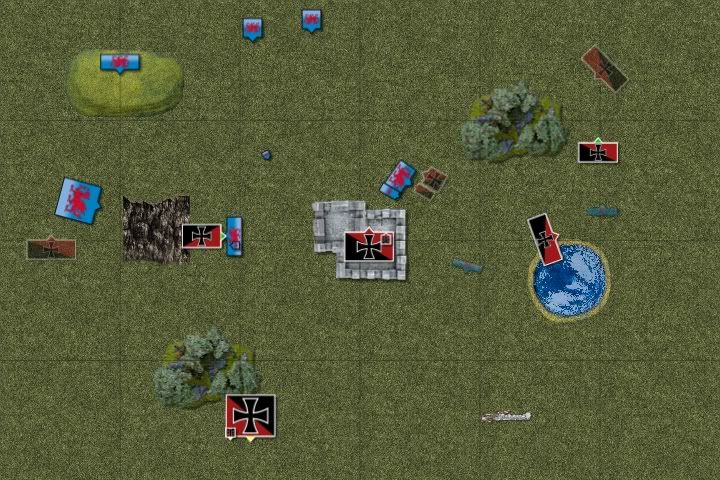
Turn 4
Considering the distance yet between them as the daemon engine the LSG chose not to charge the Hellcannon and moved closer instead. No other movement was made and magic and shooting did nothing. In combat the Hellcannon killed another PG but failed to break them.
The Chaos turn proved the turning point in the game. Seeing the positioning of the Dragon Princes the Khorne Knights turned on their heel knowing they could get a flank charge next turn. Also the Marauders rallied, though it was too little too late. Magic saw both Chaos spells getting off but Flickering Fire failed to kill the last Swordsmaster and the 4 S2 hits from the Gateway was unable to damage to Dragon Princes. In combat the stalemate continued with another PG cut down and the Hellcannon failing to break them.
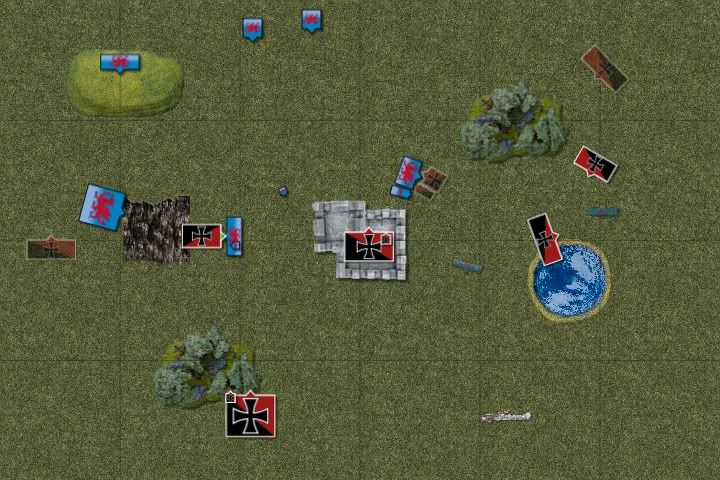
Turn 5
The Dragon Princes charged the Hounds who fled, seemingly allowing the Khorne Knights their flank charge. The LSG also charged into the back of the Hellcannon. Magic did nothing, however it didn't matter. In a rookie error by me, both myself and Dave realised I had exposed the Khorne Knights' flank to the two RBTs which we had forgotten about since they couldn't shoot the last two turns. At long range and through soft cover both needed 5's to hit. Both hit single shot, each killing two and reducing the Chaos army to breaking point.
However, tournament rules dictated that we still had to finish the turn, so it was all down to the Hellcannon to pull the draw here. To start the combat the Hellcannon takes 3 wounds between the two units of Elves. All 5 attacks from the Hellcannon hit and wound, yet all 5 ward saves are passed by the PG. Thunderstomp then gets 5 wounds also and all 5 wards are passed, sealing the game as a 17-3 to Dave.
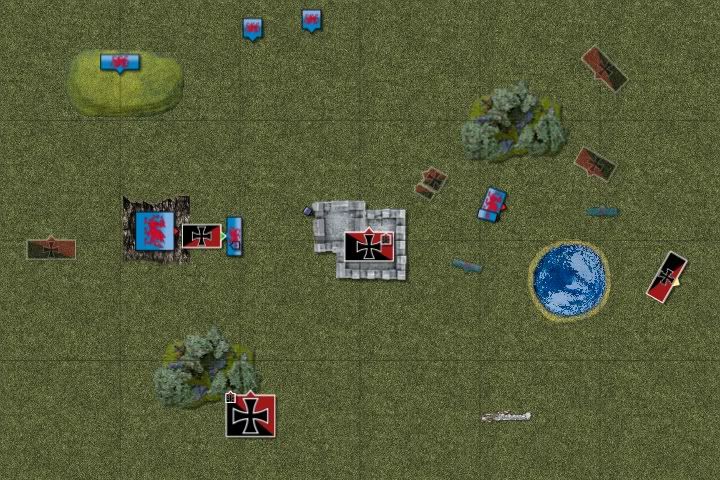
Conclusions
Well first let it be said that this was my favourite game from the whole tournament. Dave was a gent to play against and the game was really topsy turvy with some great moments and fights. In hindsight I can easily see my two flaws, one being the obvious Knight-flank incident. The other however was my play of the Warriors. I have a habit of getting my Warriors into buildings and getting comfortble there, resulting in me not being aggressive enough with them. Looking back, if I had moved the Warriors out in turn 3 and rear charged the Phoenix Guard I would have won the game in that turn.
Either way it was fun as hell. This loss put me onto table 6 to play and old friend Derek 'Jarvis' Mitchell. I didn't have my Dragon and spiky elves with me for this encounter however, so I knew Derek's Ogres were licking their chops for revenge and seeing his new list didn't ease my anxiety. Stay tuned.
Arch Mage [ Level 4 ]
Folariath's Robe, Talisman of Saphery, Dispel Scroll, High Magic
Noble
BSB, Battle Banner, Dragon Armour, Lance, Barded Elven Steed
20x Phoenix Guard
Full Command, Banner of Sorcery
15x Swordsmasters
Full Command
15x White Lions
Full Command, Gem of Courage
5x Dragon Princes
Full Command
25x Lothern Sea Guard
Full Command, Shields
20x Spearmen
Full Command
10x Archers
RBT
RBT
High Magic was a nice change from Life and Death, however it kept me on my toes for this game. He rolled Shield of Saphery, Vaul's Unmaking, Flames of the Phoenix, and Courage of Anaerion on top of Drain Magic. I rolled good for my own spells once again getting Flickering Fire, Pandaemonium, Treason, and Gateway. Deployment for the game can be seen in the below diagram and as per usual contains vanguards also. The High Elves managed to get the first turn.
Turn 1
In a very un-Elf-like fashion the High Elf army charged forward, splitting around the building in the centre. Their phase had quite a devastating turnout, with an irresistable Flames of the Phoenix taking out 29 of the Marauders, and Vaul's Unmaking getting a really high roll forcing me to burn my scrolls to preserve my Puppet. Shooting then saw a unit of Horsemen taken out, reducing my fortitude to 8.
The Chaos turn started off with misfortune as the Hellcannon rampaged and failed to hit anything. No charges were declared and the army manuvered around the High Elves. The Horsemen successfully supressed march blocking and tore up the right flank. Both units of Hounds moved into prime blocking positions while the Knights behind positioned for charges. The Warriors moved up to the building though keeping line of sight on the White Lions. The Maruaders were forced to reform in order to maintain any form of combat ability. Magic only saw one spell getting through, however that Gateway killed 11 Swordsmasters and caused the rest to panic and flee.
Turn 2
The White Lions reared a charge against the blocking Hounds but the muts fled, enough too to allow the Knights a charge in the Chaos turn. The Spearmen unphased by the silly dogs passed march blocking test and moved onward. The LSG moved up slightly to get shots on the Hellcannon and the PG braced for the charge. The SM rallied also while the Dragon Princes simply wheeled to flank the Chaos Knights should opportunity arise. All magic failed with the Arch Mage even miscasting and taking a wound. The Archers and LSG unloaded their collective 35 shots at the Hellcannon but failed to even dent the hull. The RBTs however managed to wipe out the Horsemen bringing the Chaos fortitude down to 7.
The Chaos army trumped and bellowed and the charge was sounded and almost the entire army engaged. The Khorne Knights hit the Spearmen head on, as did their Nurgle brethren to the White Lions. The Marauders and Hellcannon also collectively charge the Phoenix Guard. The Warriors entered the building while the Hounds stayed with their back to the Phoenix Guard hoping beyond hope to bait them out of position. Magic was unimpressive as Gateway got scrolled. Combat was slightly more successful with 8 Spearmen, 11 White Lions and 8 Phoenix Guard getting killed for only 5 Marauders and a single Knight in return. Unfortunately however none of the units broke (even though the Phoenix Guard were testing on a 3).
Turn 3
The High Elf turn proved short and bitter. The LSG moved around to rear charge the Hellcannon next turn while the rest of the army stayed still at their vantage points. Magic was rather lacklustre though a crucial Shield of Saphery got through to the Dragon Princes. Combat went rather awry for the Chaos forces. The PG made a rake of successful ward saves, only losing two elves and breaking the Marauders thus being able to turn to face the Hellcannon. This saw Chaos fortitude reduced to 6. The Khorne Knights fluffed on attacks killing only 4 Elves and losing one of their own, though winning the combat. Furthermore the Chaos BSB fluffed up allowing the White Lions to strike down 3 more Knights before getting killed off. This however finally saw the elven fortitude reduced to 8.
Chaos needed to turn things around. The Nurgle Knights charged headlong into the Dragon Princes, expecting an easy fight should they manage to take out the BSB. The Marauders then failed to rally in the only other act of the movement phase. Magic was rather disappointing once again only killing 3 Swordsmasters; that being said only the champion was left dropping the elven fortitude to 7. In combat the Hellcannon killed another 3 Elves for a wound in return but lost combat. The Knights finally broke through the Spearmen making an impressive overrun, and dropping the elven fortitiude to 6. The Nurgle Knights faired less well however. In a challenge the Knight champion fought the Elven BSB who turned out to only have S4 attacks. Only one wounded and in typical fashion the champion failed his 2+ AS. Furthermore in the combat the S3 Dragon Princes only did one wound to the remaining Knight and he failed his 1+ AS reducing Chaos fortitude to 5, and then to 4 after the BSB was broken (though not before killing 2 Elves; the rest passed their ward saves).
Turn 4
Considering the distance yet between them as the daemon engine the LSG chose not to charge the Hellcannon and moved closer instead. No other movement was made and magic and shooting did nothing. In combat the Hellcannon killed another PG but failed to break them.
The Chaos turn proved the turning point in the game. Seeing the positioning of the Dragon Princes the Khorne Knights turned on their heel knowing they could get a flank charge next turn. Also the Marauders rallied, though it was too little too late. Magic saw both Chaos spells getting off but Flickering Fire failed to kill the last Swordsmaster and the 4 S2 hits from the Gateway was unable to damage to Dragon Princes. In combat the stalemate continued with another PG cut down and the Hellcannon failing to break them.
Turn 5
The Dragon Princes charged the Hounds who fled, seemingly allowing the Khorne Knights their flank charge. The LSG also charged into the back of the Hellcannon. Magic did nothing, however it didn't matter. In a rookie error by me, both myself and Dave realised I had exposed the Khorne Knights' flank to the two RBTs which we had forgotten about since they couldn't shoot the last two turns. At long range and through soft cover both needed 5's to hit. Both hit single shot, each killing two and reducing the Chaos army to breaking point.
However, tournament rules dictated that we still had to finish the turn, so it was all down to the Hellcannon to pull the draw here. To start the combat the Hellcannon takes 3 wounds between the two units of Elves. All 5 attacks from the Hellcannon hit and wound, yet all 5 ward saves are passed by the PG. Thunderstomp then gets 5 wounds also and all 5 wards are passed, sealing the game as a 17-3 to Dave.
Conclusions
Well first let it be said that this was my favourite game from the whole tournament. Dave was a gent to play against and the game was really topsy turvy with some great moments and fights. In hindsight I can easily see my two flaws, one being the obvious Knight-flank incident. The other however was my play of the Warriors. I have a habit of getting my Warriors into buildings and getting comfortble there, resulting in me not being aggressive enough with them. Looking back, if I had moved the Warriors out in turn 3 and rear charged the Phoenix Guard I would have won the game in that turn.
Either way it was fun as hell. This loss put me onto table 6 to play and old friend Derek 'Jarvis' Mitchell. I didn't have my Dragon and spiky elves with me for this encounter however, so I knew Derek's Ogres were licking their chops for revenge and seeing his new list didn't ease my anxiety. Stay tuned.
Subscribe to:
Posts (Atom)